Inverter
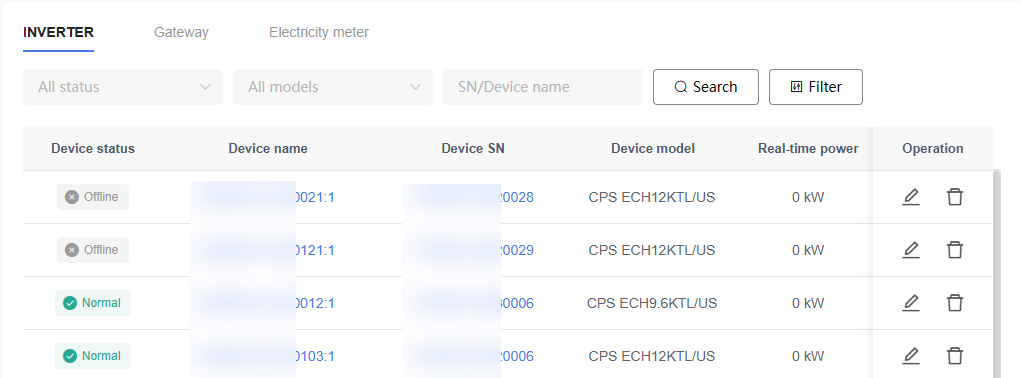
The Inverter page is used to view and manage PV Inverter Devices in the platform. Users can view Device operating status, real-time operating data, power generation statistics, and Device configuration parameters.
- List Page
In the Device list, click the Inverter name or Device SN to enter the Inverter Details page.
- Device Details Page
The Inverter Details page provides Device operating status, real-time data, historical records, and Device management functions, helping users comprehensively understand Device operating conditions.
The Inverter Details page contains the following function tabs:
| Tab | Description | Applicable Scenarios |
|---|---|---|
| Overview | View basic Device information, operating status, and real-time data. | Residential PV / Residential ESS / C&I PV / PV Utility |
| Chart Data | View Device historical operating curves and statistical data. | Residential PV / Residential ESS / C&I PV / PV Utility |
| Energy | View Energy generation-related statistical information. | Residential PV / Residential ESS / C&I PV / PV Utility |
| Alarm | View Device event and Alarm records. | Residential PV / Residential ESS / C&I PV / PV Utility |
| Data | View operating data uploaded by the Device. | Residential PV / Residential ESS / C&I PV / PV Utility |
| Remote Settings | View and configure Device parameters. | Residential PV / Residential ESS / C&I PV / PV Utility |
| Upgrade | Perform Firmware Upgrade and view Upgrade history. | Residential PV / Residential ESS / C&I PV / PV Utility |
| AutoTest | Perform automatic tests compliant with Italian regulatory requirements, and support viewing test results and test reports. | Available only for Devices configured with Italian grid code. |
| Mode | Configure Device operating modes and related operating parameters. | Residential ESS |
| Dry Contact | Configure Dry Contact control strategies for smart loads or generators. | Only supports Residential ESS Devices in Asia-Pacific and Europe regions. |
| Quick Settings | Quickly configure commonly used Device operating parameters. | Only supports Residential ESS Devices in Asia-Pacific and Europe regions. |
Overview
The "Overview" tab is used to view the current operating status, power generation information, and real-time operating data of the Inverter.
PV Inverter Overview
This page contains the following information:
Key Device Operating Information: Operating status, daily Energy generation, real-time power, total Energy generation
Device Information: displaying basic Inverter information: Device name, Site name, Device SN, Device model, Gateway SN, Firmware version, creation time, grid code type
Real-Time Information: displaying current Device operating data, including but not limited to: daily operating time, efficiency, power factor, active power, reactive power, grid frequency, phase A/B/C voltage, phase A/B/C current
MPPT Information: real-time operating data of MPPT channels. The actual number of MPPT channels and data items displayed may vary depending on the Inverter model.
Residential Storage Inverter Overview
This page contains the following information:
Key Device Operating Information: Operating status, current operating mode, daily PV Energy generation, SOC
Device Information: displaying basic Inverter information: Device name, Site name, Device SN, Device model, Gateway SN, Firmware version, creation time, grid code type
Inverter Information: Voltage, current, and active power of the Inverter
Grid Information: Grid voltage, current, energy purchased, and energy sold
Load Information: Load consumption, non-backup load active power
Battery Information: Battery status, charge/discharge status, etc.
String Information: Voltage, current, and power of each string
Chart Data
The "Chart Data" tab is used to view the change trends of Inverter historical operating data. Users can analyze Device operating status, power generation conditions, and grid parameters by selecting different data items and time ranges.
Steps:
Enter the target Inverter Details page.
Click the "Chart Data" tab.
Select the statistics period (Day, Month, or Year).
Select the corresponding time.
Select the measurement points.
The system automatically generates a data trend chart for the corresponding time range.

NOTE NOTE
The data types supported may vary depending on the model.
The actual data items available for viewing depend on the Device model.
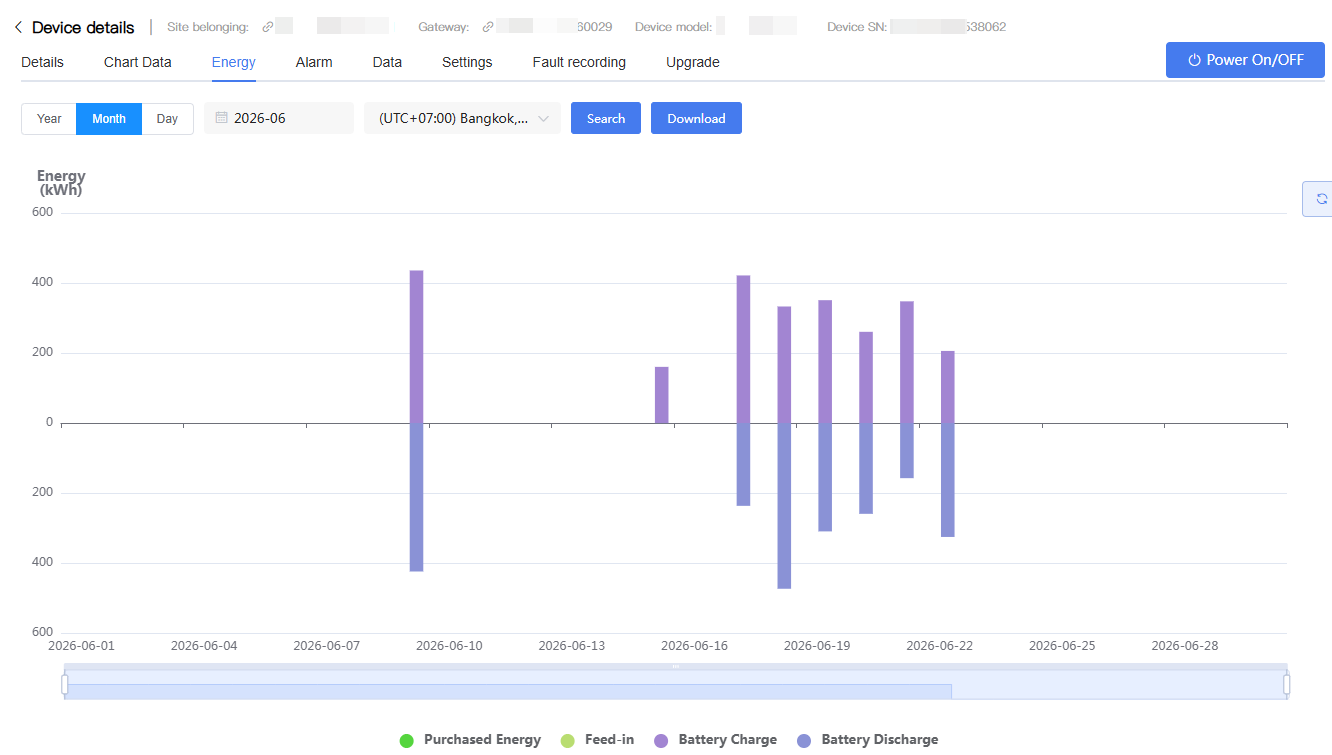
Energy
The "Energy" tab is used to view the energy flow direction and power generation statistics of the Inverter.
Steps:
Enter the target Inverter Details page.
Click the "Energy" tab.
Select the statistics period (Day, Month, or Year).
Select the corresponding time.
View the energy statistics results and energy flow charts.
To export data, click "Download" to download the current statistics.
NOTE NOTE
The energy flow items displayed may vary depending on the model:
For energy storage Inverters, the chart typically includes PV, load, grid import, grid export, battery charge, and battery discharge data.
For PV Inverters, the chart typically includes PV, load, and grid export data.
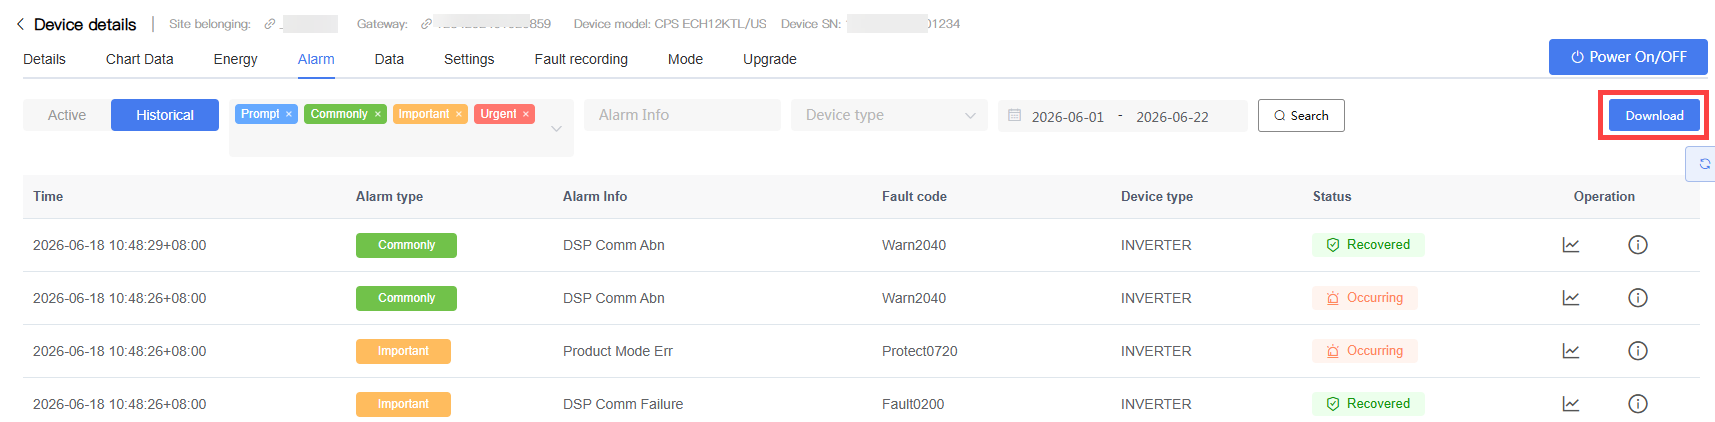
Alarm
The "Alarm" tab is used to view event records and Alarm information generated by the Inverter, helping users understand Device operating status and fault conditions.
Enter the target Inverter Details page.
Click the "Alarm" tab.
Select the target alarm type (such as "Current Alarm" or "Historical Alarm") based on your needs, and set the corresponding filter criteria:
For Current Alarms: Filter by Alarm type, Alarm Info, or Device type.
For Historical Alarms: Filter by Alarm type, Alarm Info, Device type, or Time range.
Click "Search" to view event or Alarm records that match the criteria.
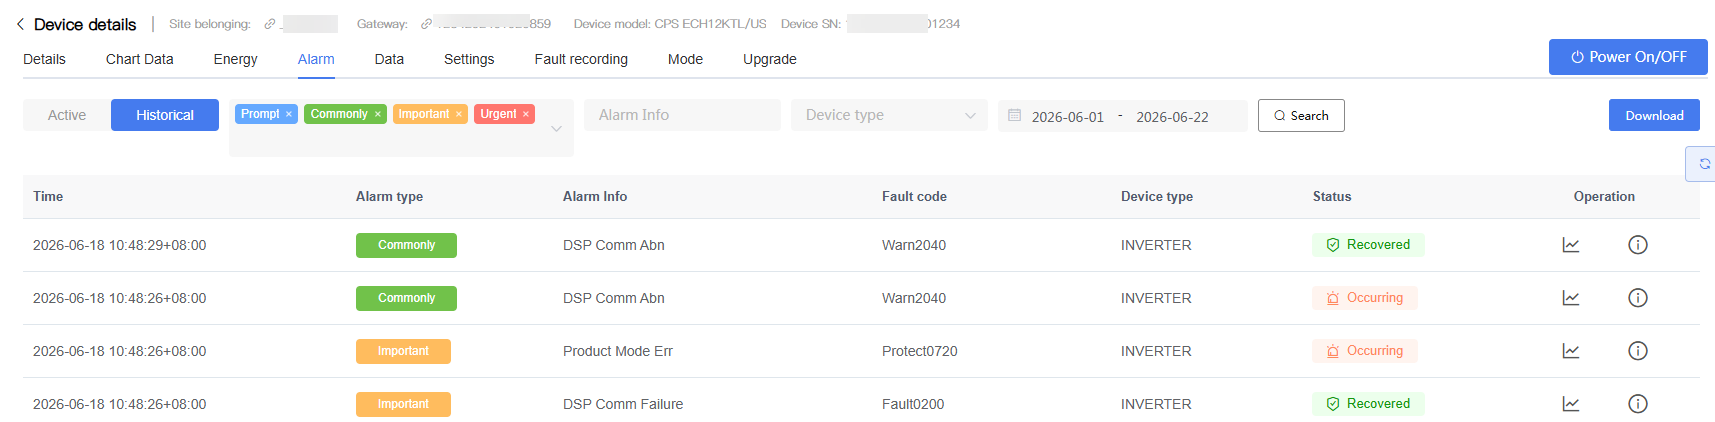
- To view the fault curve, click "Fault Curve" for the corresponding record.
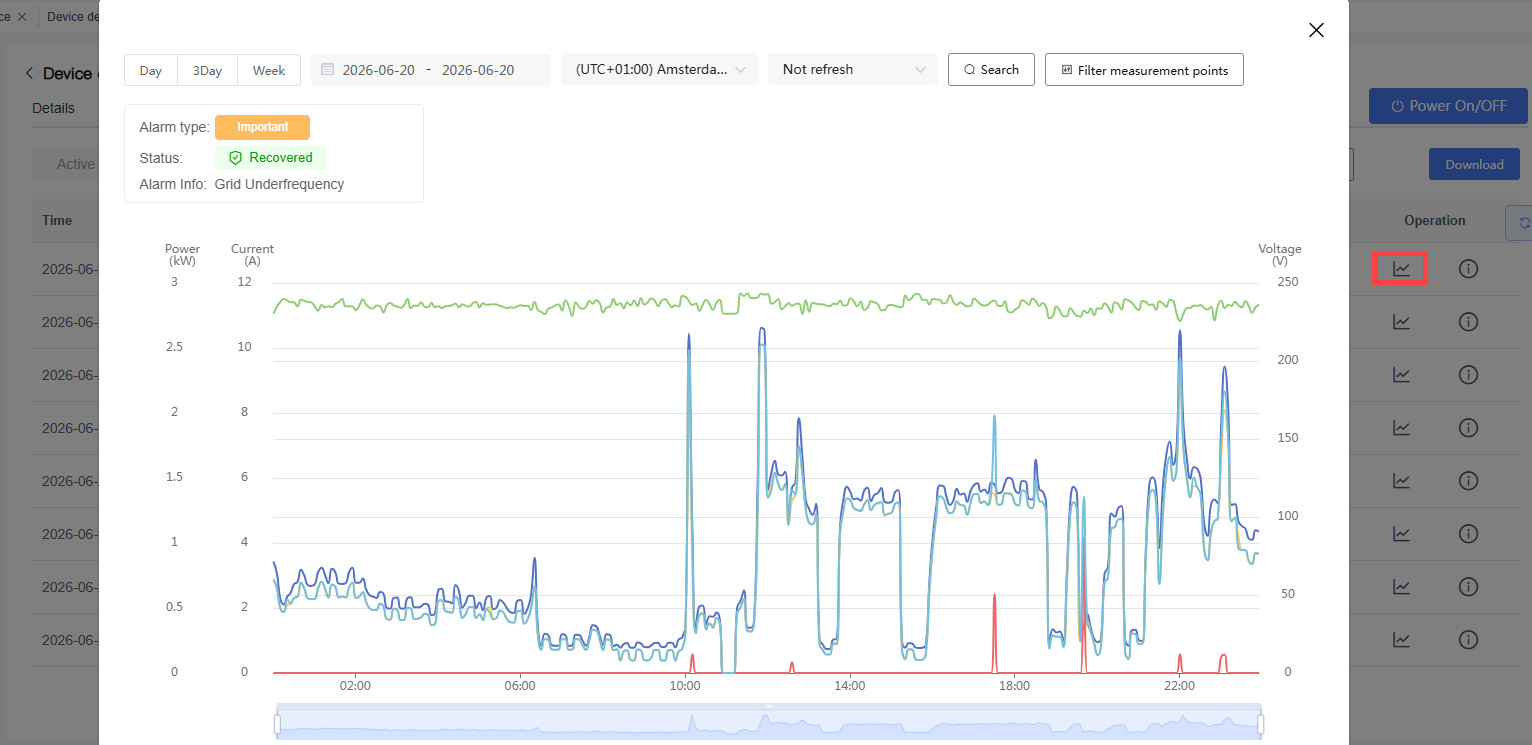
- To view detailed information, click "View Details" for the corresponding record.
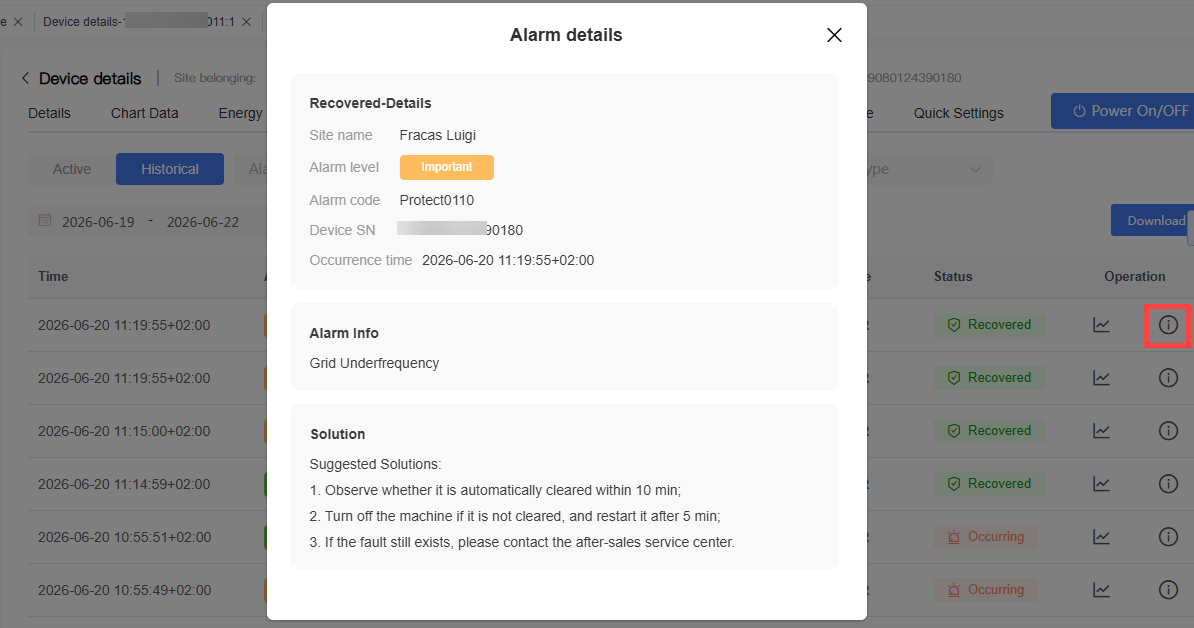
- To export records, click "Download" in the upper-right corner of the Alarm list.
Data
The "Data" tab is used to view historical operating data on the Inverter.
Steps:
Enter the target Inverter Details page.
Click the "Data" tab.
Select the time range.
Click "Search" to view historical data.
To export data, click "Download".
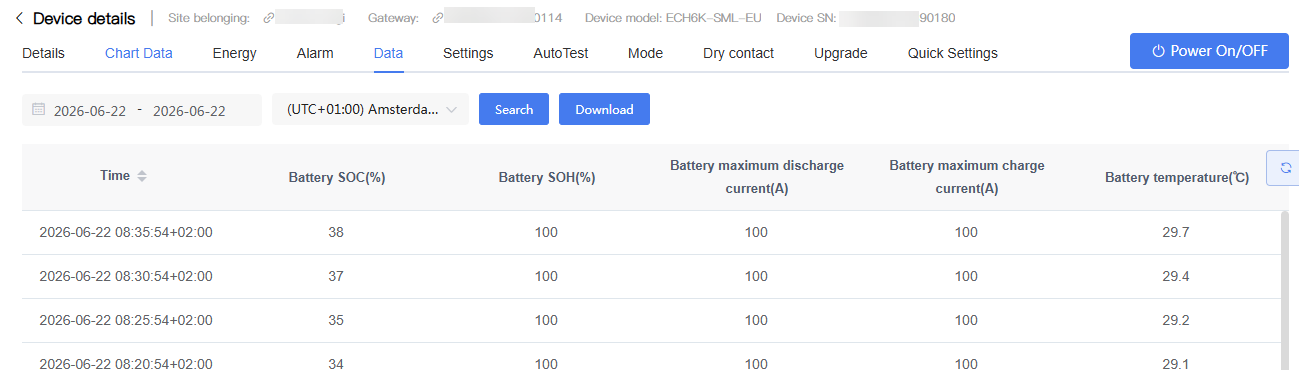
NOTE
The data list displays the operating data uploaded by the Inverter within the corresponding time period. The exportable data content depends on the Device model and the selected time range.
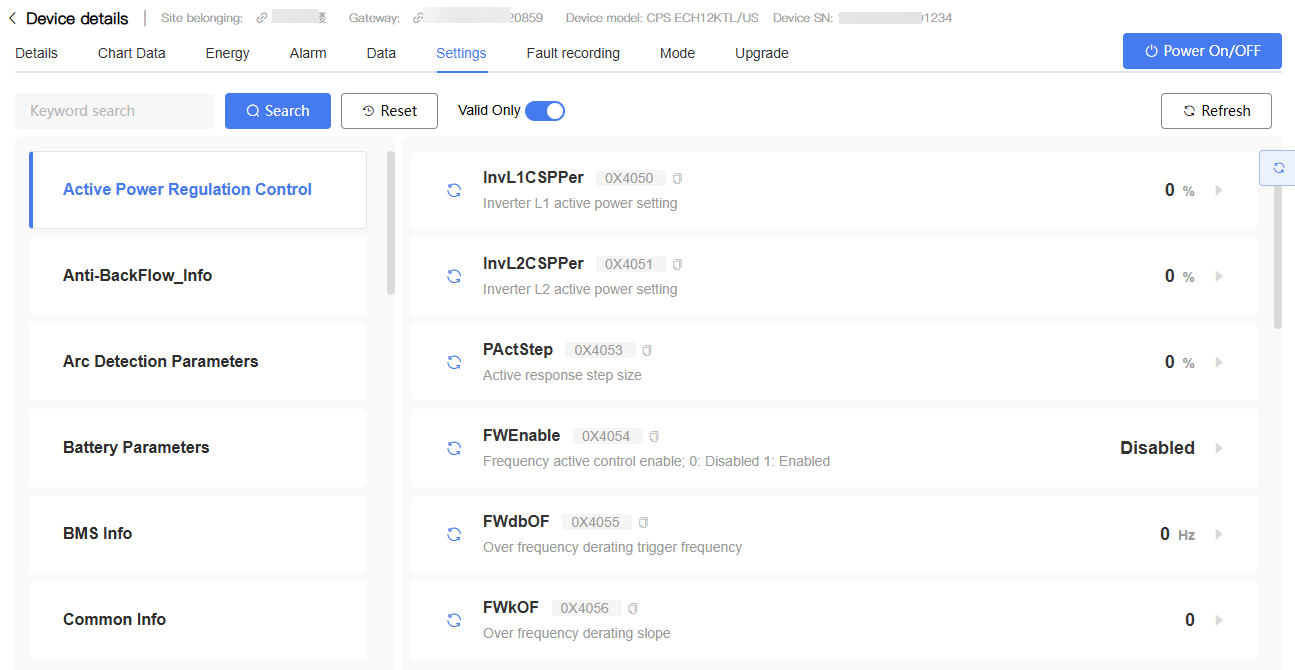
Settings
The "Settings" tab is used to view and configure Inverter operating parameters. Users can remotely read Device parameters and modify parameters that support writing.
Steps:
Enter the target Inverter Details page.
Click the "Remote Settings" tab.
In the parameter group list on the left, select the parameter group you wish to view, then locate the parameter you wish to view or modify on the right side of the page. (To find a specific parameter, you can also enter a keyword in the search box and click "Search".)
To restore the default display conditions, click "Reset".
To view only valid parameters, enable the "Valid Only" toggle.
To refresh the page data, click "Refresh".
NOTE
The parameters and parameter groups supported may vary depending on the model.
Only parameters that support writing can be modified.
After modification, parameters are directly delivered to the Device. Please operate with caution.
It is recommended that only personnel with relevant permissions and expertise perform parameter configuration.
Upgrade
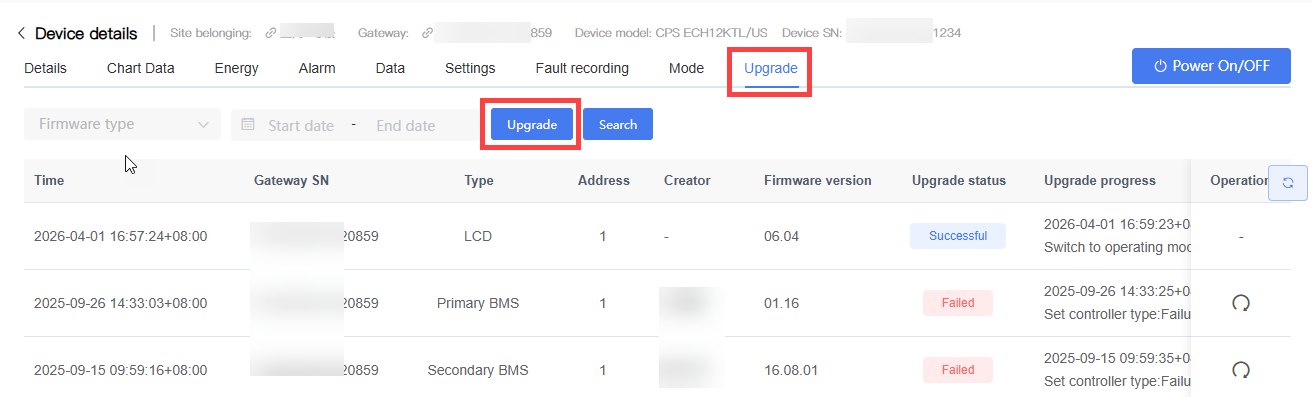
The "Upgrade" tab is used to perform Firmware Upgrade on the Inverter and view the Device's Upgrade history.
Perform Firmware Upgrade
Steps:
Enter the target Inverter Details page.
Click the "Upgrade" tab.
Click the "Upgrade" button.
In the Upgrade window that appears, select the Firmware type to be upgraded, such as LCD, DSP, ARC Board, BMS Master, BMS Slave.
Select the target Firmware version.
Choose the upgrade method as needed:
Yes: Schedule the upgrade task. If selecting scheduled upgrade, set the scheduled time.
No: Execute the upgrade task immediately.
Click "Confirm" to create the upgrade task.
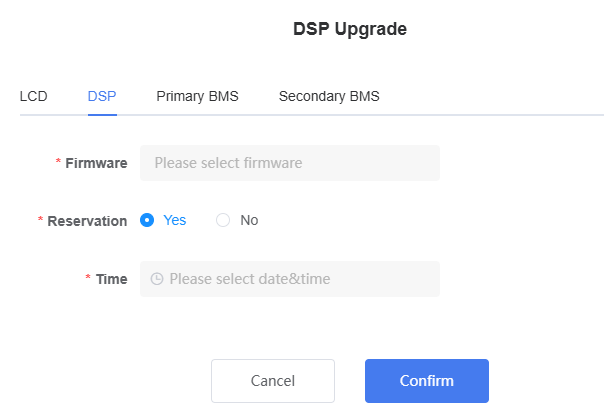
- After successful creation, you can view the upgrade status and progress in the upgrade record list.
View Upgrade Records
The upgrade record list displays the historical upgrade tasks for the current Device.
Users can set filter criteria as needed:
Firmware type
Time range
Click "Search" to view upgrade records meeting the criteria.

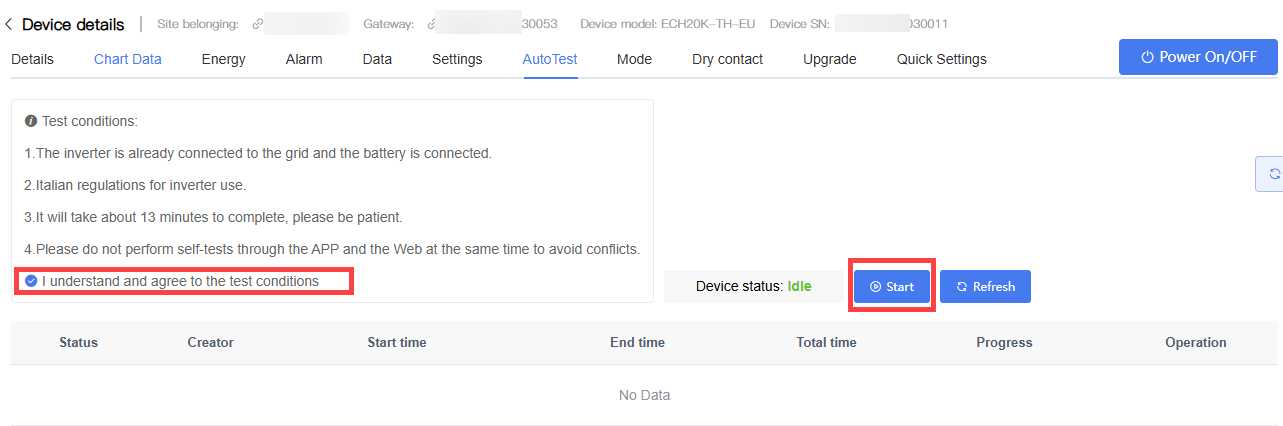
AutoTest (Applicable to Italian Grid Code)
The AutoTest function is used to perform automatic tests required by Italian grid connection regulations. This function is displayed only when the Inverter grid code is set to Italian grid code.
Steps:
Enter the target Inverter Details page.
Click the "AutoTest" tab.
Read the test conditions.
After confirming that the test requirements are met, select "I have read and agree to the test conditions".
Click "Start" to begin the automatic test.
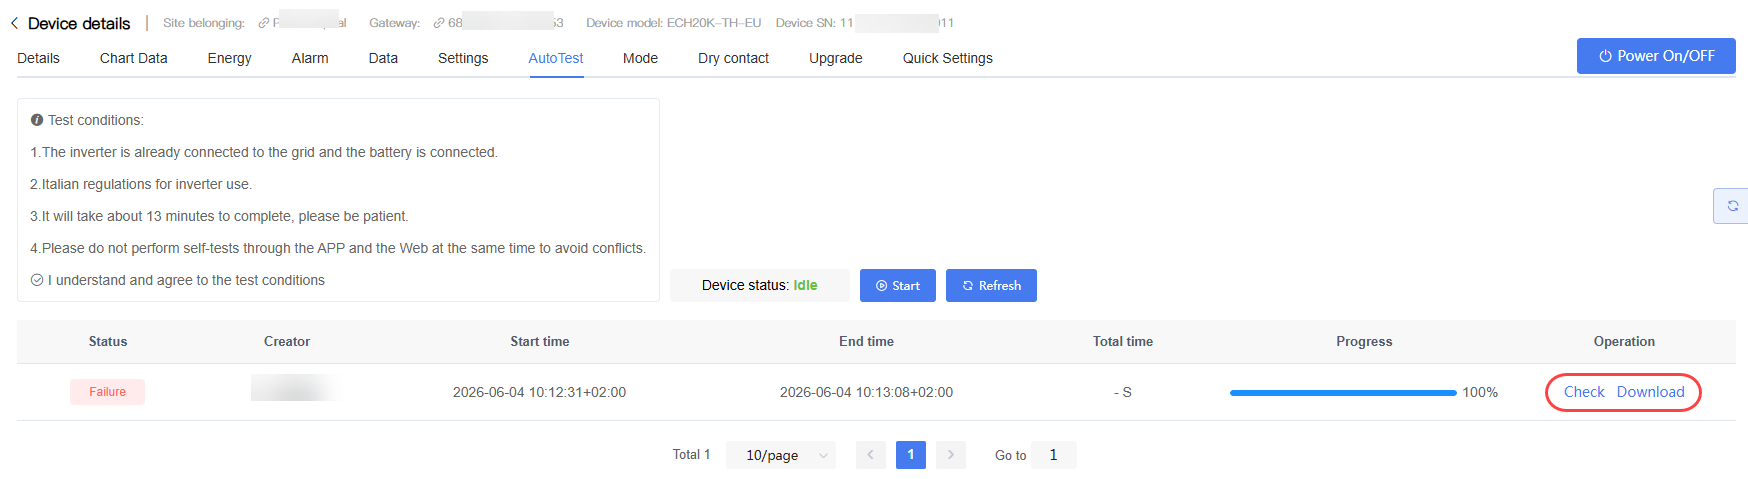
During the test, you can click "Refresh" to view the latest test status and progress.
After the test is complete, you can view the test results in the test record list.
Click "Check" to view test details.
Click "Download" to download the test report.
NOTE
The AutoTest function is only applicable to Inverters using the Italian grid code.
When the Inverter is configured with other grid codes, this function is not displayed.
Test items and the execution process may vary depending on the Device model and regulatory requirements.
Please perform relevant tests in accordance with local regulatory requirements.
Mode (Applicable to Residential ESS Only)
The "Mode" tab is used to configure the operating mode of residential storage Inverters. Different modes determine the energy management strategy among PV, battery, grid, and load.

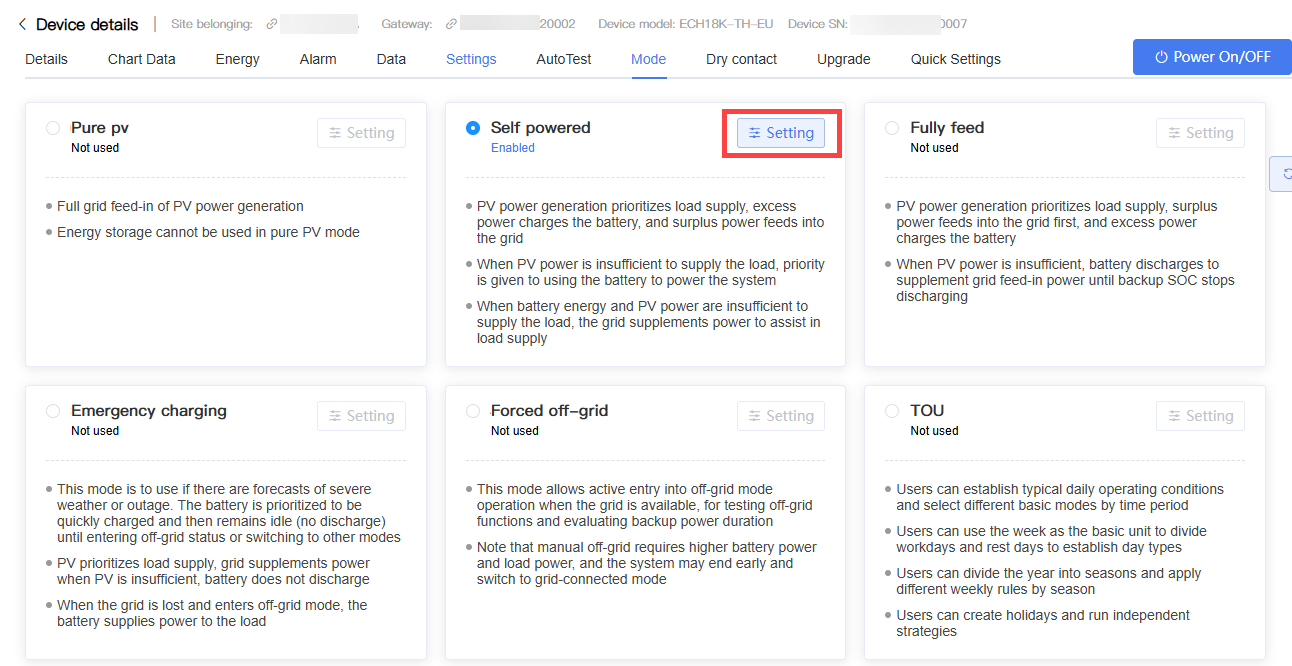
The Mode page includes the following operating modes:
| Mode | Description |
|---|---|
| Pure PV | Uses the storage Inverter as a standard PV Inverter, reducing battery participation. |
| Self Powered | Prioritizes using PV power generation to meet load demand, increasing the self-consumption rate. |
| Fully Feed | Prioritizes delivering PV power generation to the grid to achieve more feed-in Revenue. |
| Emergency Charging | Prioritizes charging the battery to prepare for power outages or off-grid operation. |
| Forced Off-Grid | Prioritizes operating in off-grid mode when operating conditions are met, reducing dependence on the grid. |
| TOU (Time of Use) | Automatically switches operating strategies based on a set time plan to adapt to different electricity price periods. |
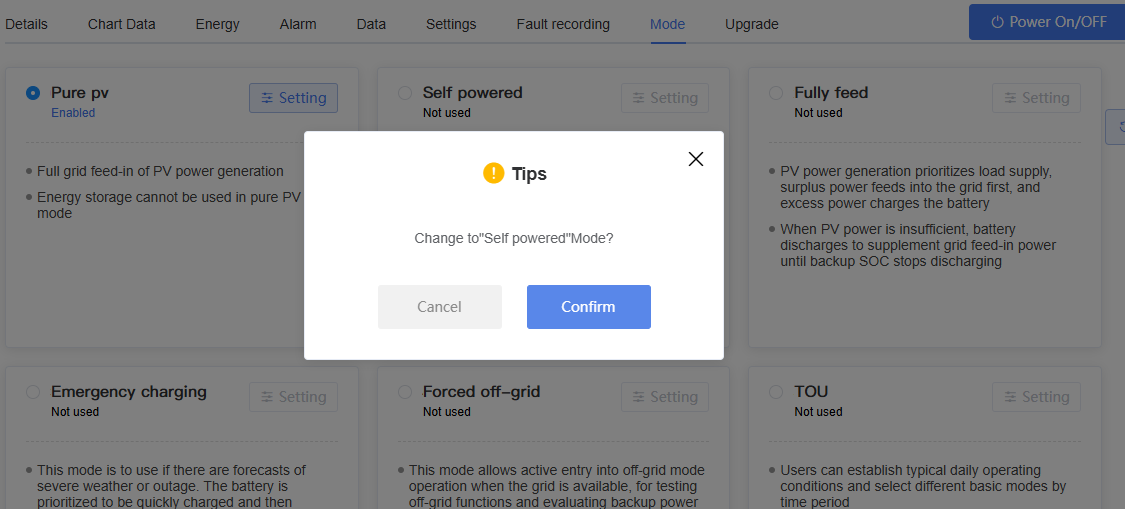
To configure the operating mode:
Enter the target Inverter Details page.
Click the "Mode" tab.
Select the operating mode to be enabled and click "Confirm".
Click "Settings" in the corresponding mode card.
Configure the relevant parameters according to actual requirements.
Click "Confirm" to apply the settings.
Configuration Items
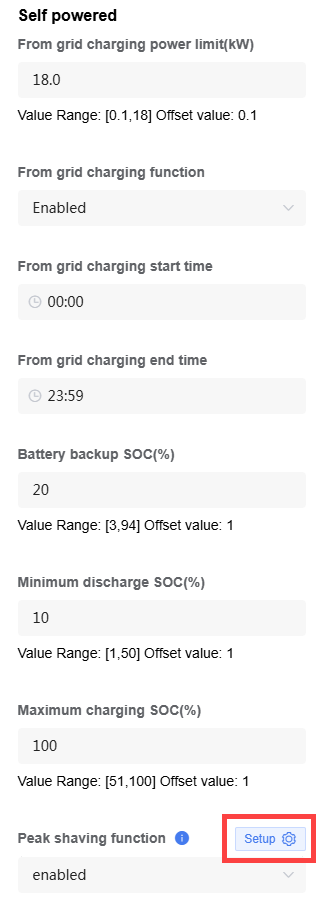
Common configuration items for Pure PV , Self-Powered, Full Feed, Emergency Charging, and Forced Off-Grid modes include:
| Setting | Description |
|---|---|
| Grid power limit function | Used to control whether the system is allowed to feed power into the grid: * Disabled: Restricts the system from discharging to the grid. When selected, the "Feed grid power limit" must be configured to limit the power fed back to the grid. * Enabled: Allows the system to discharge to the grid (feed-in). |
| From gird charging function | Sets whether the grid is allowed to charge the battery. When enabled, you can configure: * From grid charging power limit * From grid charging start time * From grid charging end time |
| Maximum Charging SOC | Sets the maximum SOC allowed for battery charging. |
| Battery Backup SOC | Sets the SOC reserved by the battery for backup power. |
| Battery Minimum Discharge SOC | Sets the minimum SOC allowed for battery discharging. |
| Peak Shaving Function (Self-Powered) | Used to limit the power drawn from the grid during peak hours to reduce peak electricity consumption. This function is only applicable to Self-Consumption mode. For detailed configuration, see Peak Shaving Function. |
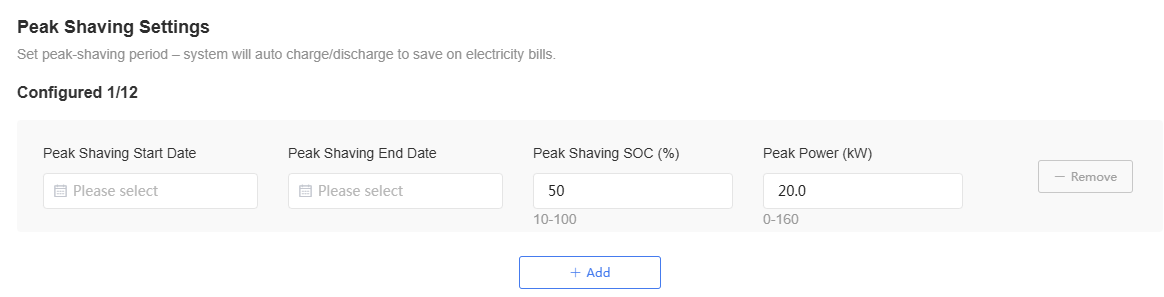
Peak Shaving Function (Self-Powered)
The Self-powered mode supports configuring the peak shaving function. After enabling peak shaving, the system can automatically execute charge/discharge strategies within the set time periods to reduce peak electricity consumption.
Steps:
Enable the Peak Shaving function
On the Mode Settings page, after enabling the peak shaving function, click "Setup".
Set the peak shaving start time and end time.
Set the peak shaving SOC and key power.
To add multiple peak shaving time periods, click "Add".
Click "Save" to apply the settings.
Configure TOU
The TOU mode is used to automatically switch operating strategies based on different time periods.
Steps:
On the Mode page, select "TOU".
Click "Settings".
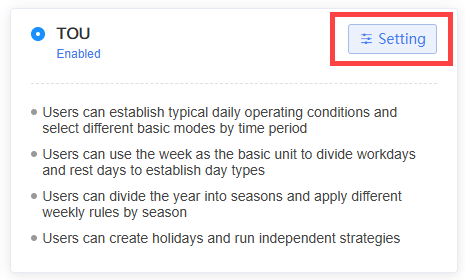
- Click "Configuration".
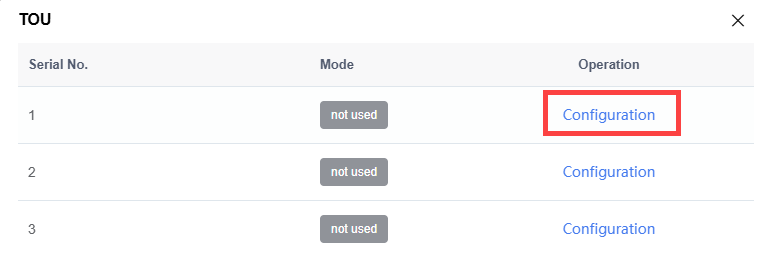
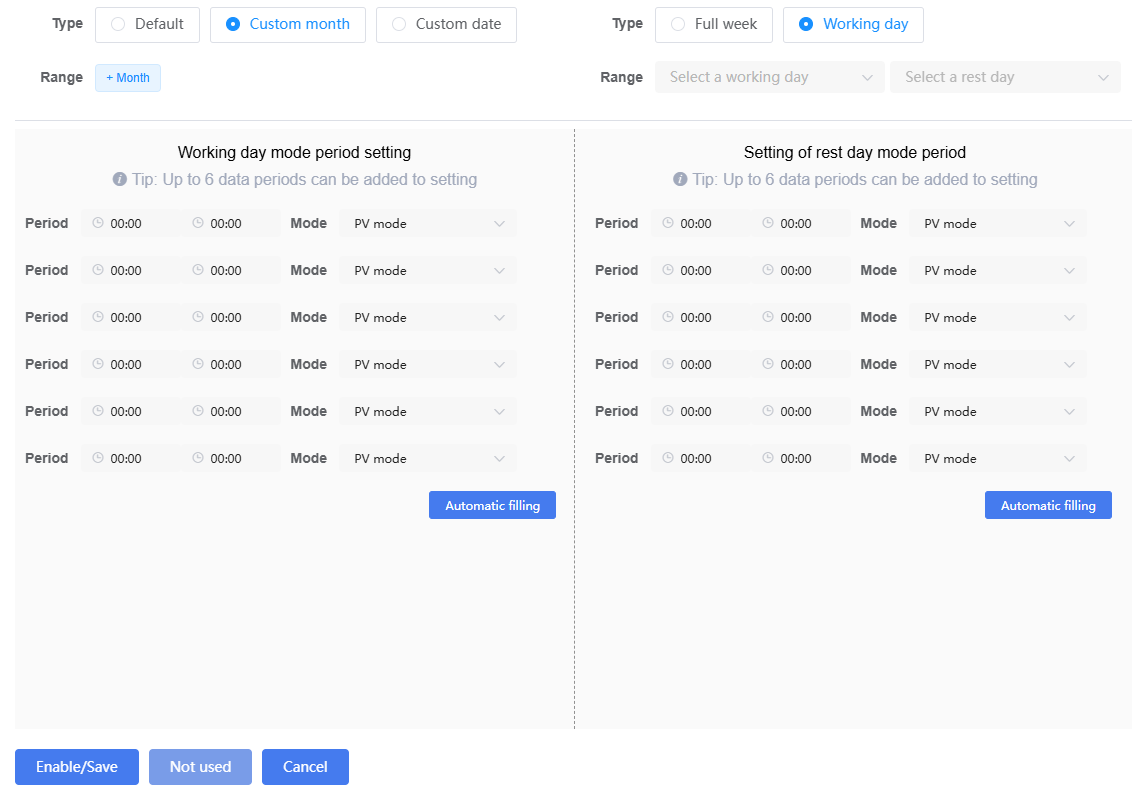
Select the type: Default, Custom Month, or Custom Date.
Set the time periods in the "Mode Period Settings".
Select the corresponding operating mode for each time period. You can add up to 6 time periods.
Click "Enable/Save" to apply the settings.
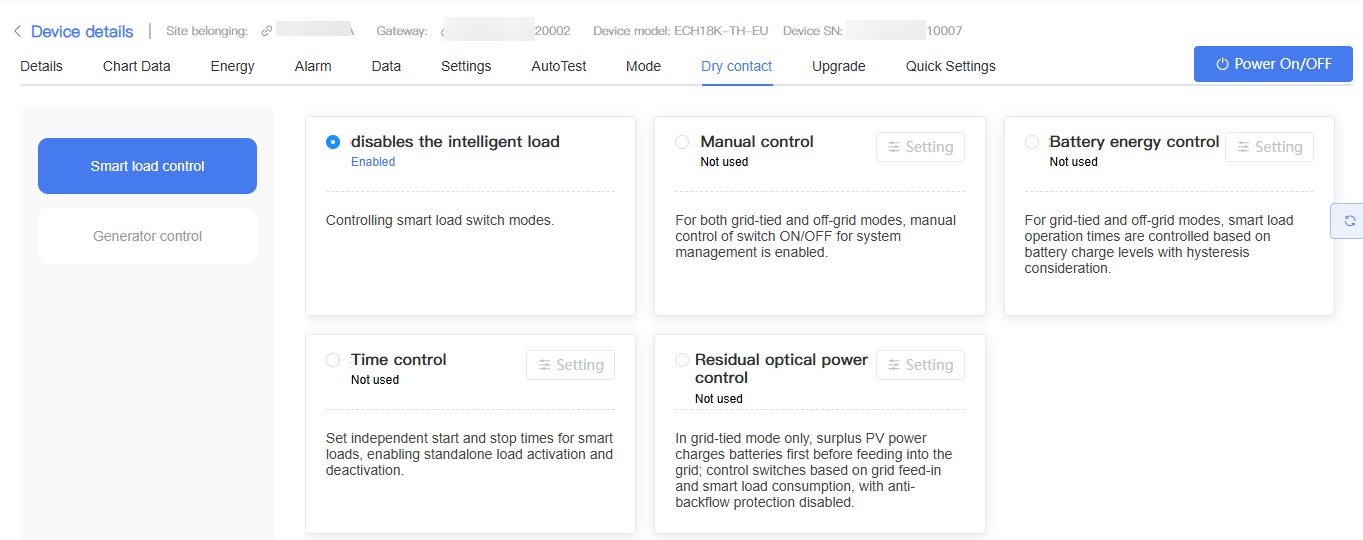
Dry Contact
The "Dry Contact" tab is used to configure the Dry Contact control function of the Inverter. Through Dry Contact, the Inverter can control the start/stop of external Devices (such as smart loads or generators) based on set conditions.
The Dry Contact page includes two control objects:
| Control Object | Description |
|---|---|
| Smart Load | Used to control the start/stop of a smart load. If enabled, you can set: - Manual control - Battery energy control - Time control - Residual optical power control |
| Generator | Used to control the start/stop of a generator. If enabled, you can set: - Manual control - Battery energy control |
Steps:
Enter the target Inverter Details page.
Click the "Dry Contact" tab.
On the left, select the control object:
Smart Load
Generator
Select the control mode to be enabled.
If the selected mode requires parameter configuration, click "Settings".
Fill in the parameters according to actual requirements and save.
NOTE
The control methods supported may vary depending on the Device model and Firmware version.
Only one control mode can be enabled at a time for the same control object.
The Dry Contact function affects the start/stop of external Devices. Please configure carefully based on on-site wiring and Device requirements.
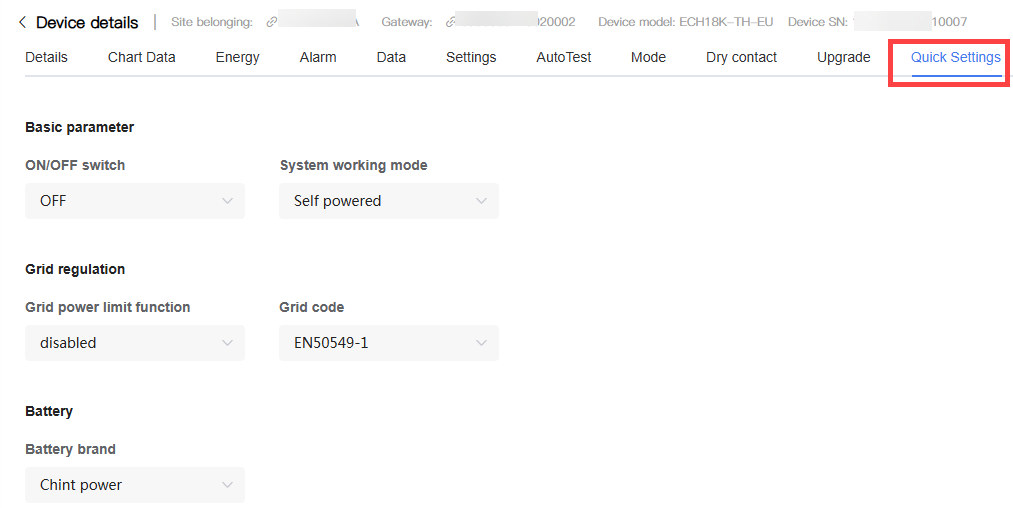
Quick Settings
The "Quick Settings" tab is used to centrally configure commonly used operating parameters of residential ESS, allowing users to quickly complete basic Device setup.
Steps:
Enter the target Inverter Details page.
Click the "Quick Settings" tab.
Modify the relevant parameters as needed.
Click "Confirm" to save the settings.
NOTE
The Quick Settings page only displays some commonly used parameters.
The actual parameters displayed may vary depending on the Device model and Firmware version.
Modifying parameters may affect the Device operating strategy. Please configure carefully based on on-site requirements.
To configure more advanced parameters, use the Remote Settings function.