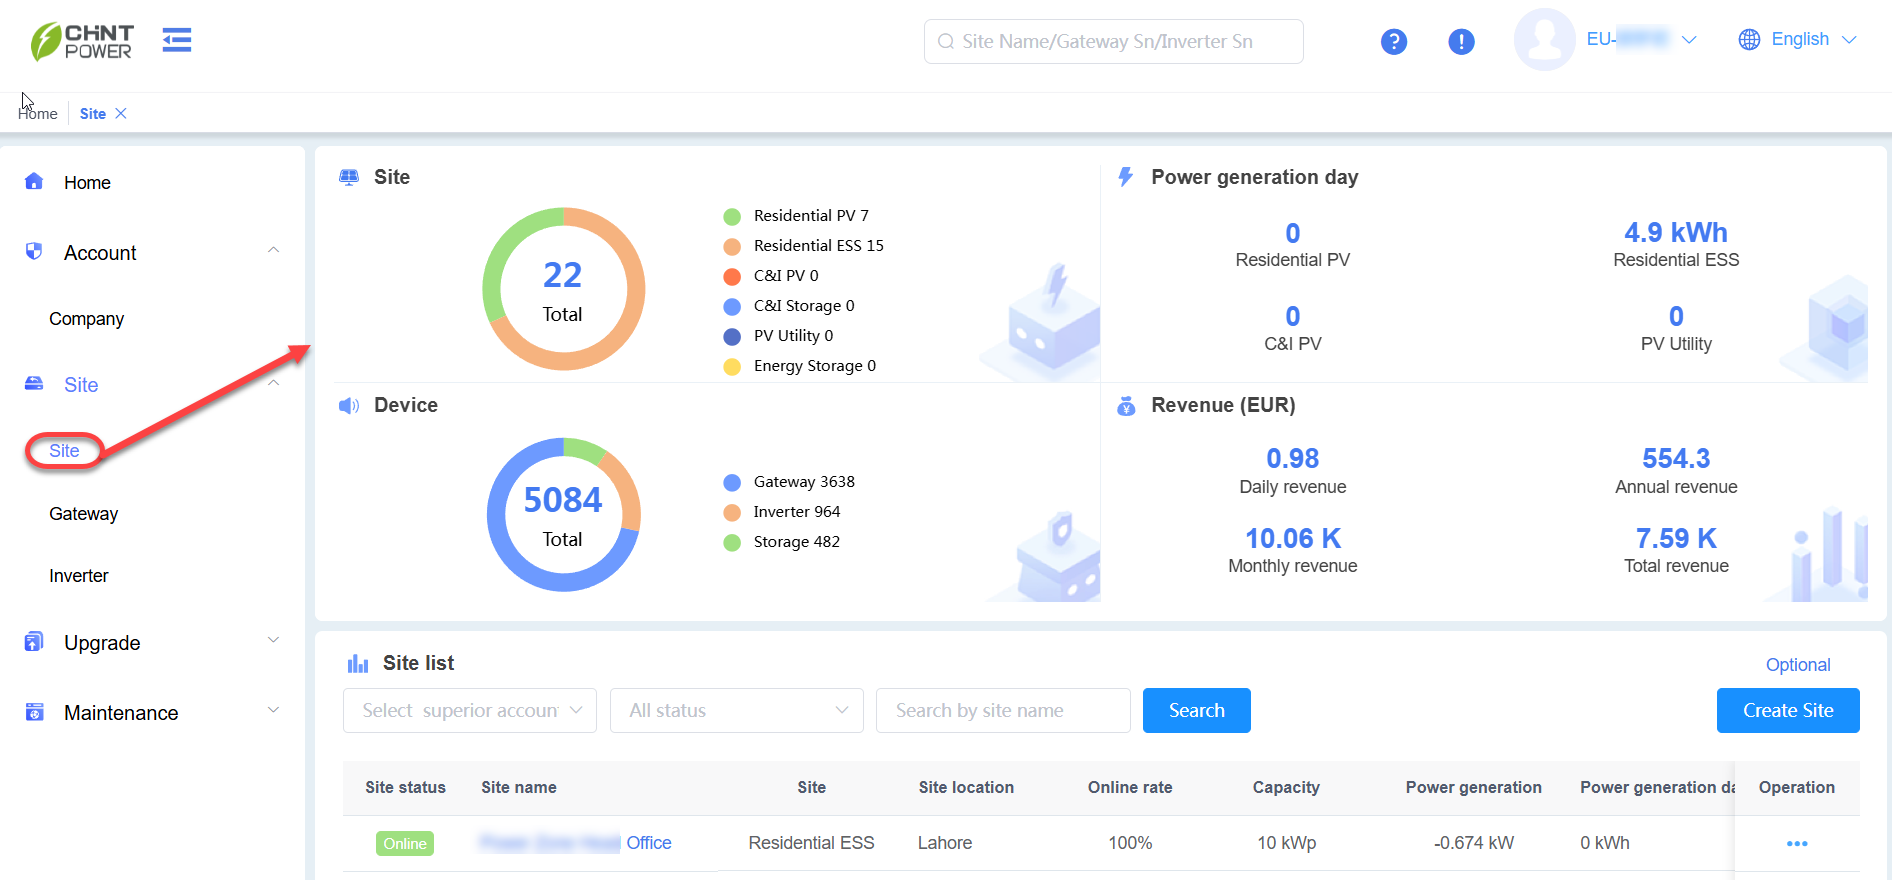
Site
The Site page allows you to manage site details and operations. On this page, you can view information about all sites, including site details, device counts, energy yield, and revenue. Click any site name to access site-specific information, device details, fault records, and to operate site devices.
Additionally, you can configure site parameters using the function buttons in the Site List area.
Manage Site
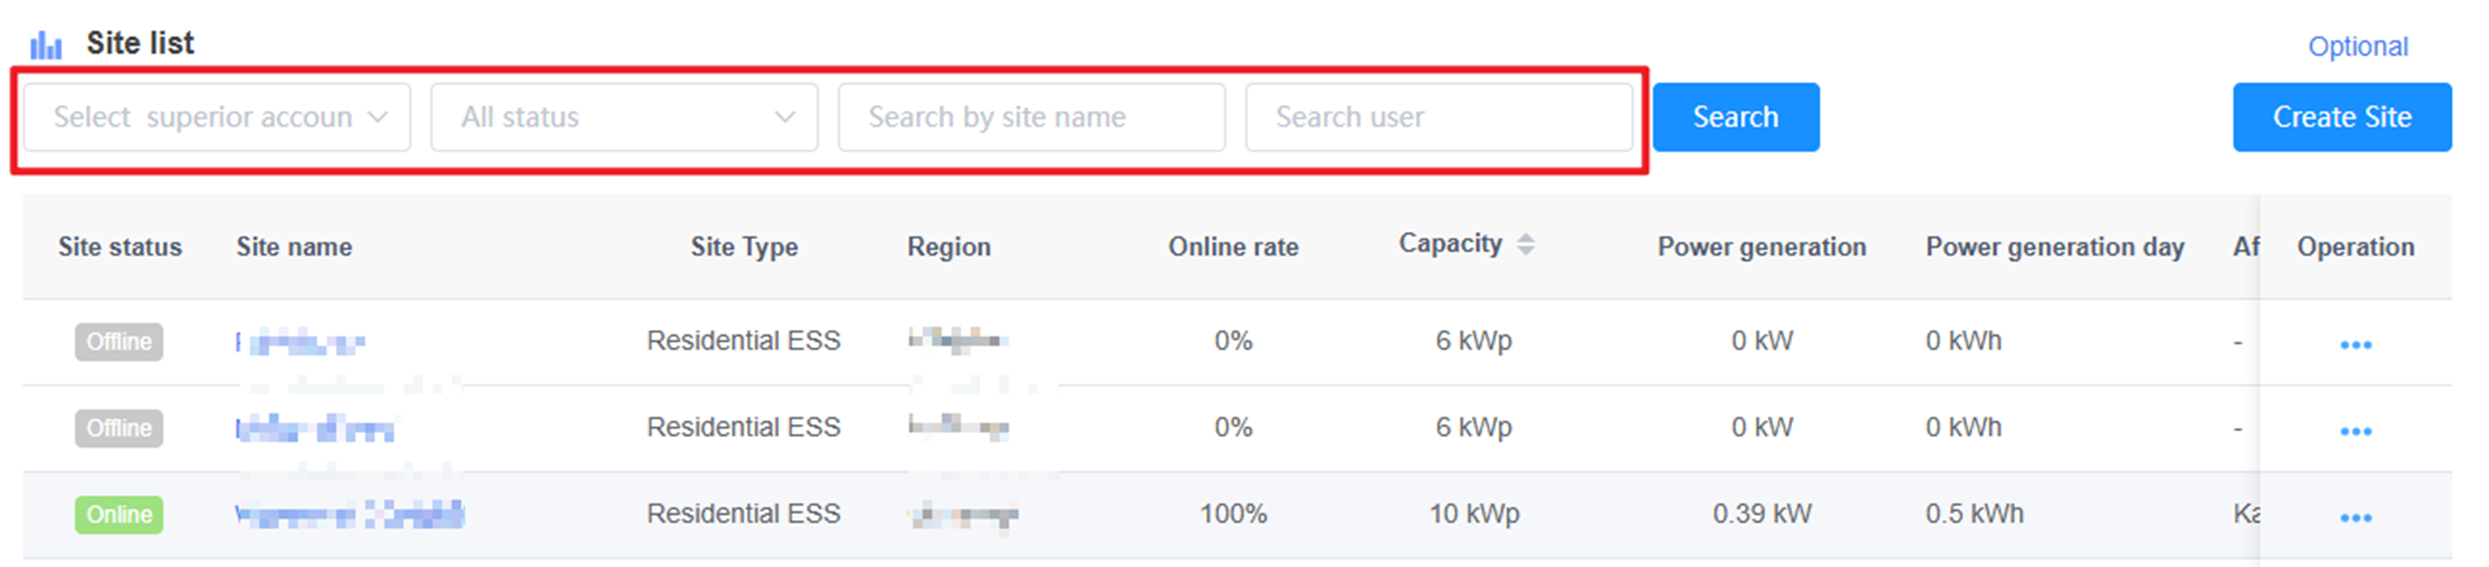
Search for Site
In the Site List area, use the search fields on the left side of the Search button to locate an existing site. Enter details in the following fields:
- Select Superior Account
- All Status
- Search by site name
- Search user
Follow these steps to customize the displayed columns:
- Click Optional in the upper-right corner.
- Uncheck the boxes for columns you want to hide, then click Confirm. The unchecked columns will no longer appear.

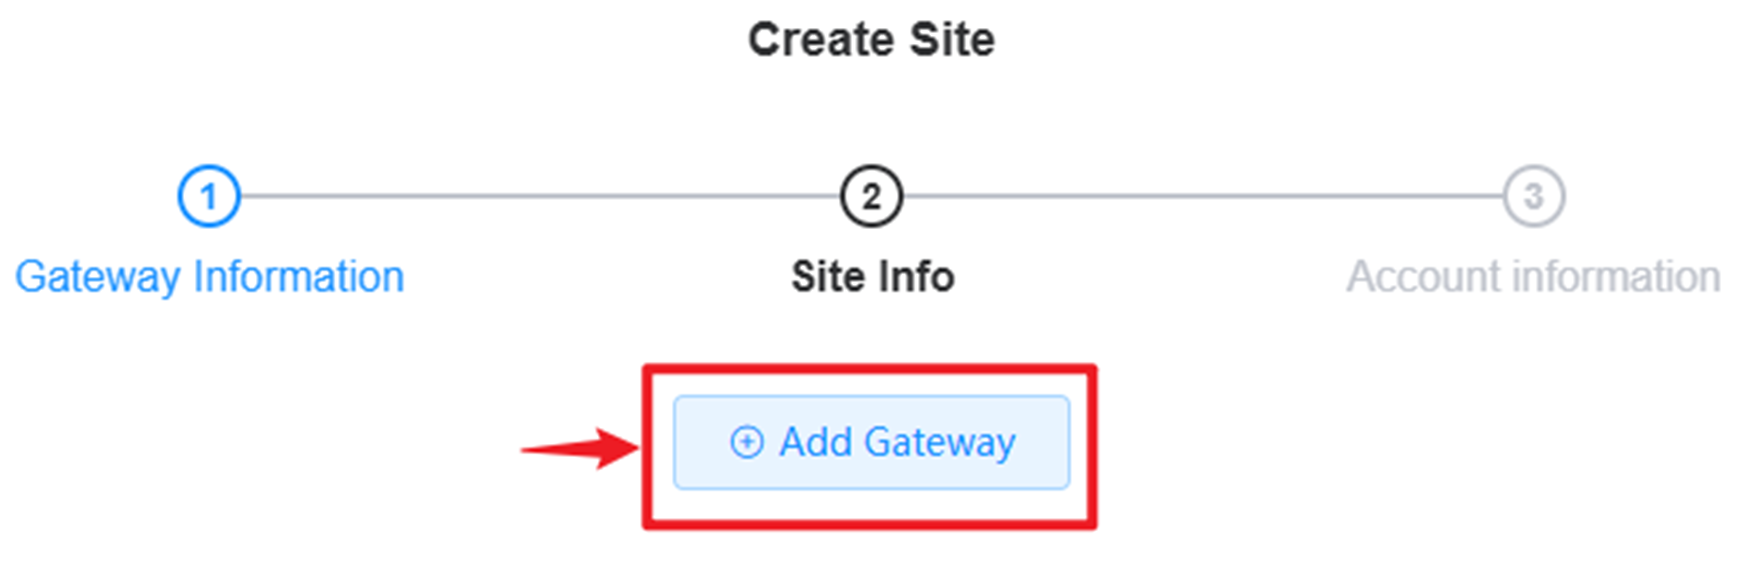
Create a Site
Follow these steps to create a new site:
Click the Create Site button to open the site creation dialog box.

(Optional) Add gateway information. You can skip this step if not applicable.
Enter the site’s basic information using the items listed below.
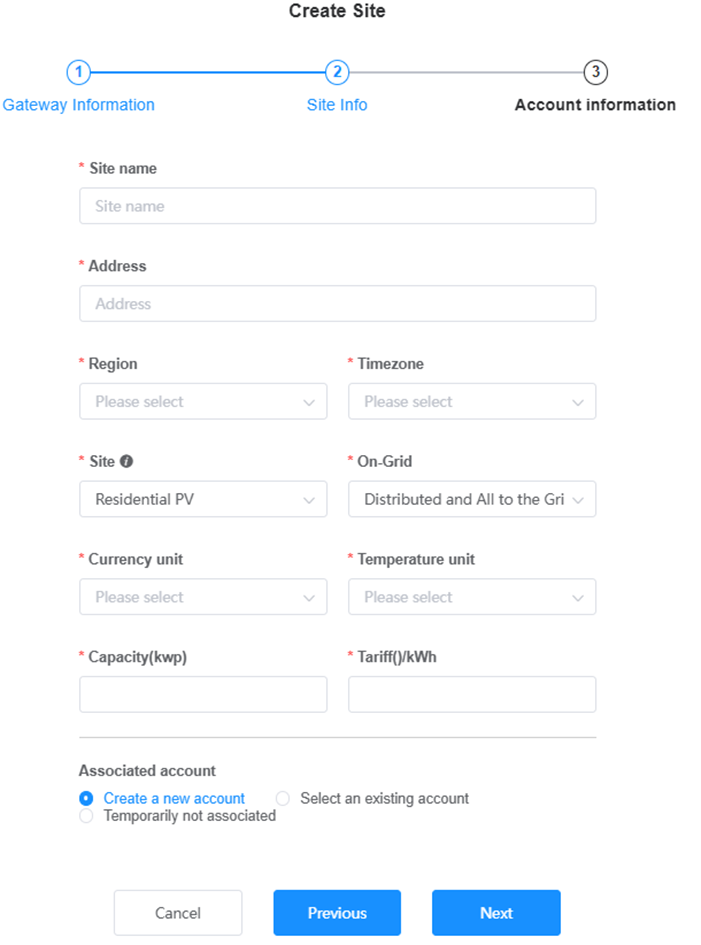
Items Description Site Name Enter the site’s name. To modify it later, use the Site Details page. Address Enter the site’s physical address based on its actual location. Region Specify the region where the site is located. Time Zone Automatically set based on the selected region. Site Type Select the site type based on its actual characteristics. On-Grid Indicate the site’s grid connection status based on its actual setup. Currency Unit Automatically set based on the selected region. Temperature Unit Automatically set based on the selected region. Capacity Enter the site’s capacity based on its actual specifications. Tariff ()/kWh Automatically set based on the selected region. You can also customize Associated Account Choose to create a new account, link an existing one, or leave it unassociated. Associate the site with an account. The options in this step depend on your selection:
- Option 1: Create a New Account: If you chose
Create a new accountin Step 3, enter the account details.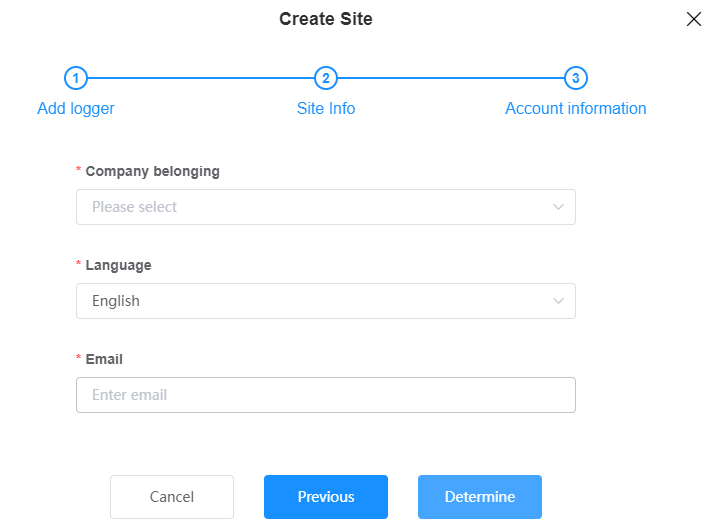
- Option 2: Select an Existing Account: If you chose
Select an existing accountin Step 3, select a user to assign the site to. (Note: You can also assign sites to users later via the Site List; see Distribute/Rename/Delete a Site.)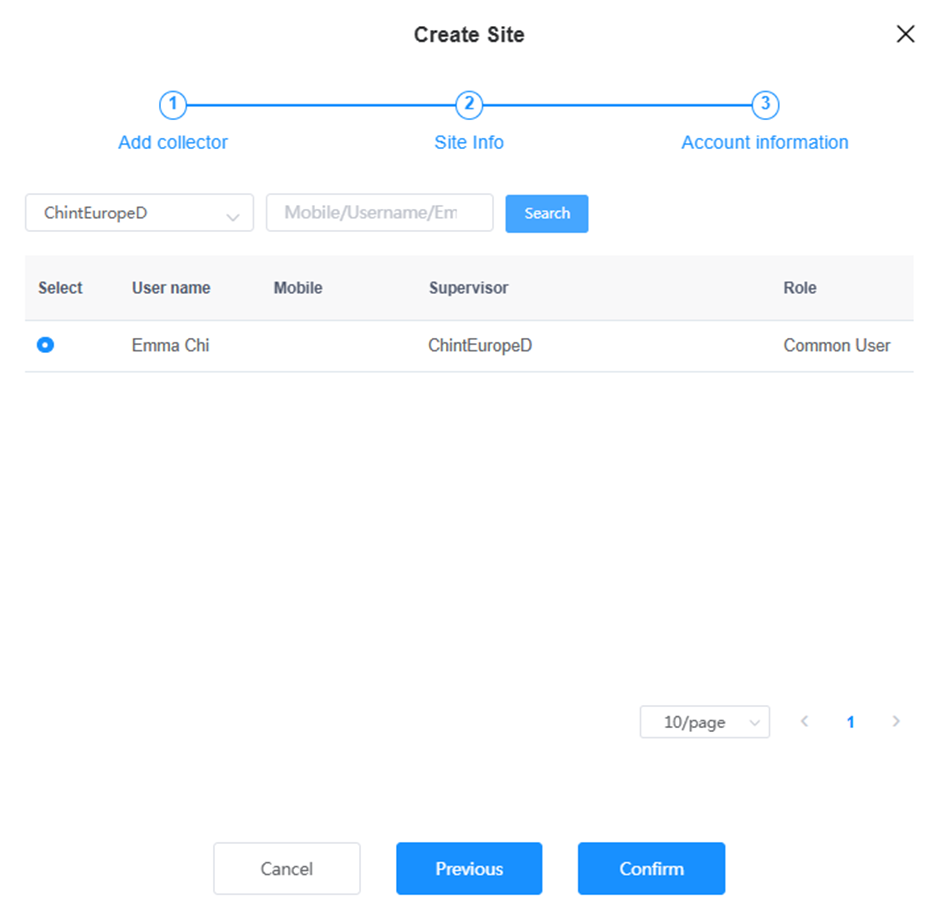
- Option 3: Temporarily Not Associated: If you chose
Temporarily not associatedin Step 3, the new site will appear in the Site List without an associated account.
- Option 1: Create a New Account: If you chose
Distribute/Rename/Delete a Site
In the Site List area, manage a site by following these steps:
Locate the site in the list.
In the Operation column, click the … icon next to the site.
Choose one of the following options:
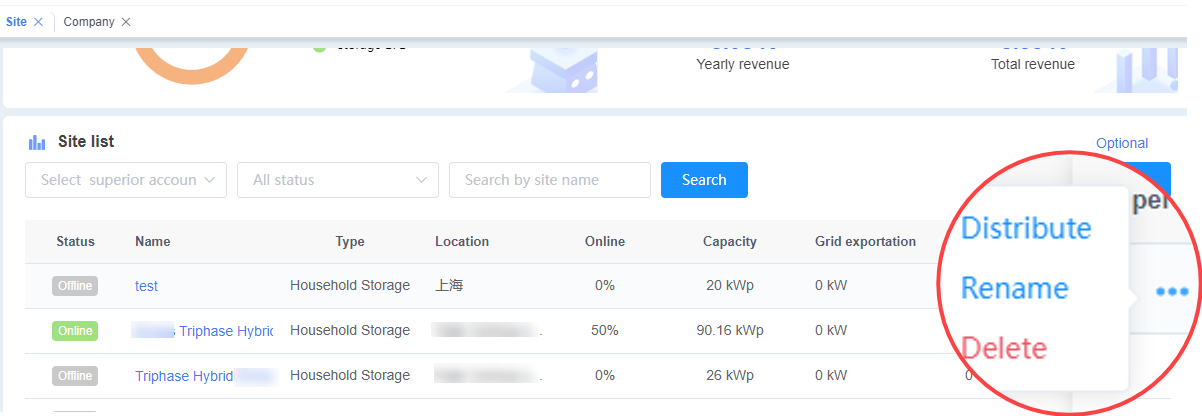
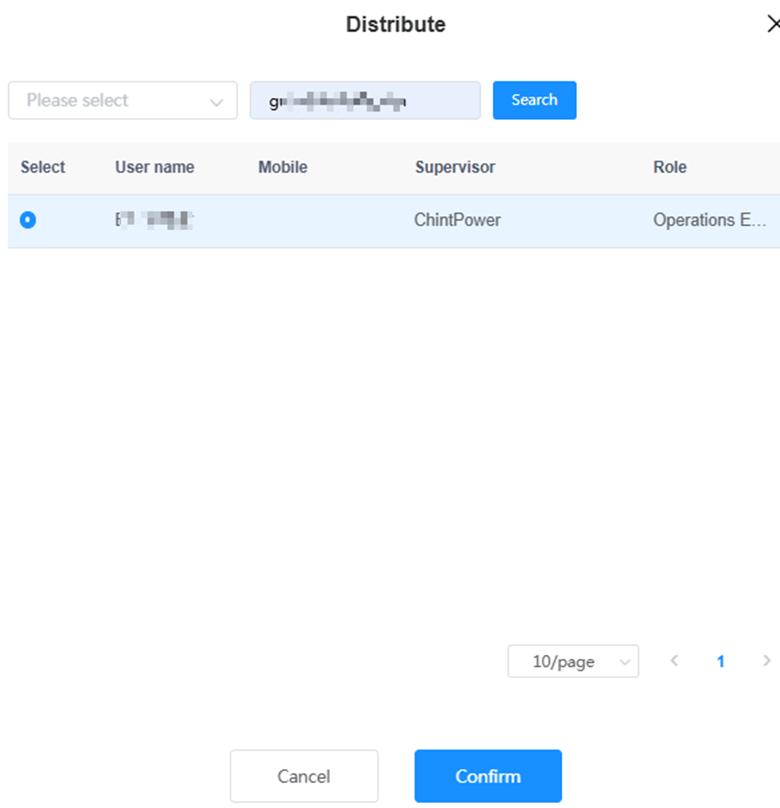
- Distribute: Assign the site to a user.
- Click Distribute.
- Search the user by select a company or input the username/email.
- Click Search, the userers as listed.
- Check the user you want to assign the site.
- Click Confirm to complete the assignment.
- Rename: Update the site’s name. (Follow the prompts to enter a new name.)
- Delete: Remove the site from the list. (Note: This action may be permanent; confirm before proceeding.)
- Distribute: Assign the site to a user.
Single Site Details
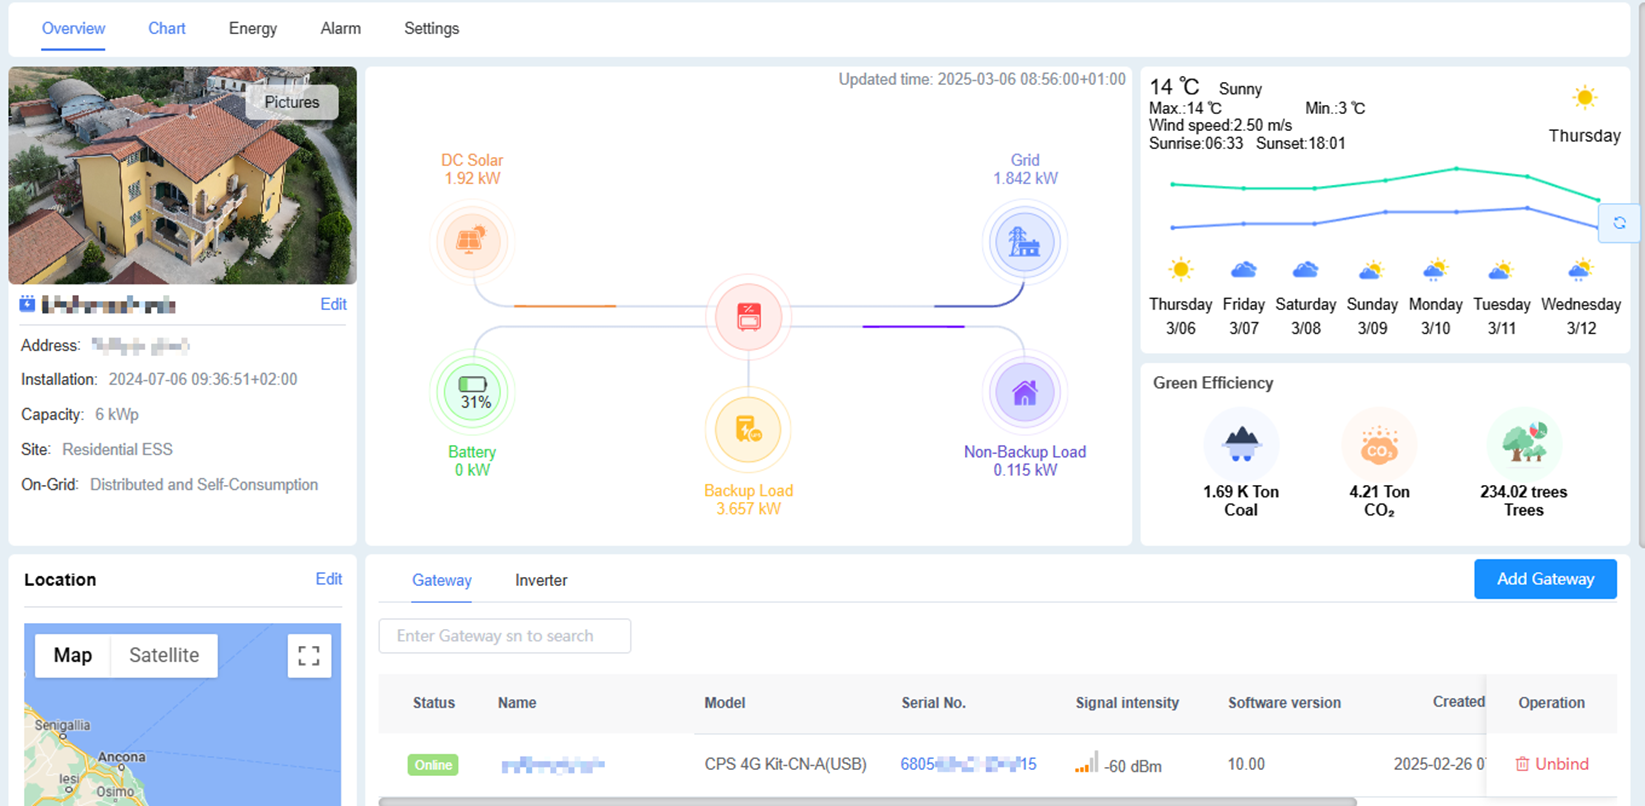
Click a site name in the Site List to open the Site Overview page.
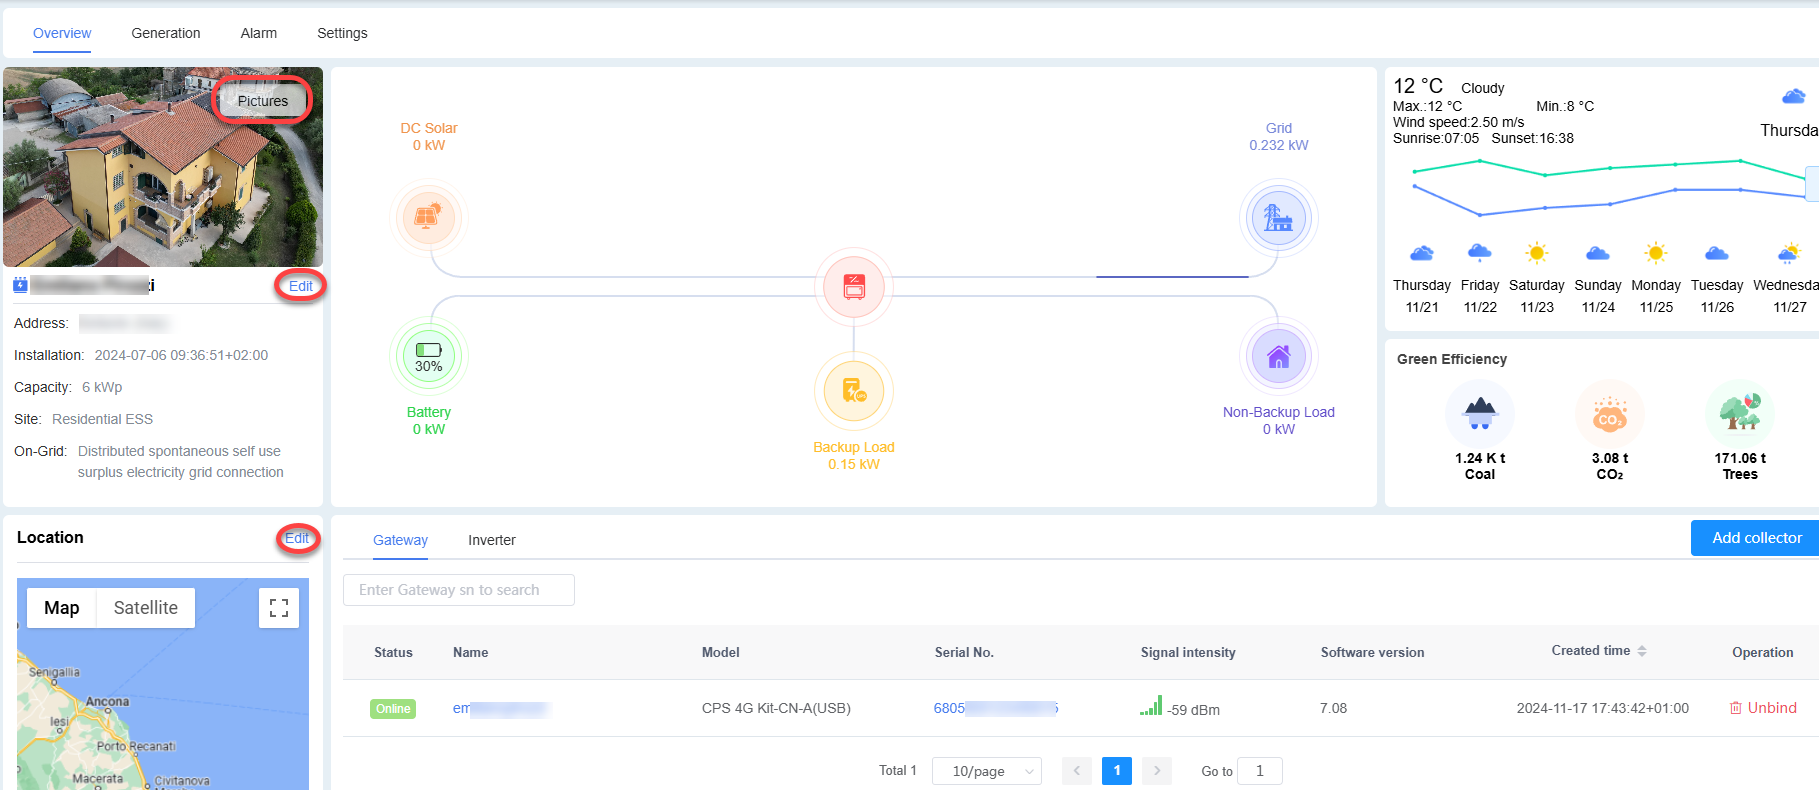
Edit Site Information and Location
In the Basic Information area, click the site picture or the Edit button to update the site’s picture and details. After entering the site’s specific address, the geographical location (site coordinates) is mapped via satellite view, and meteorological data for the past 7 days is displayed based on these coordinates.
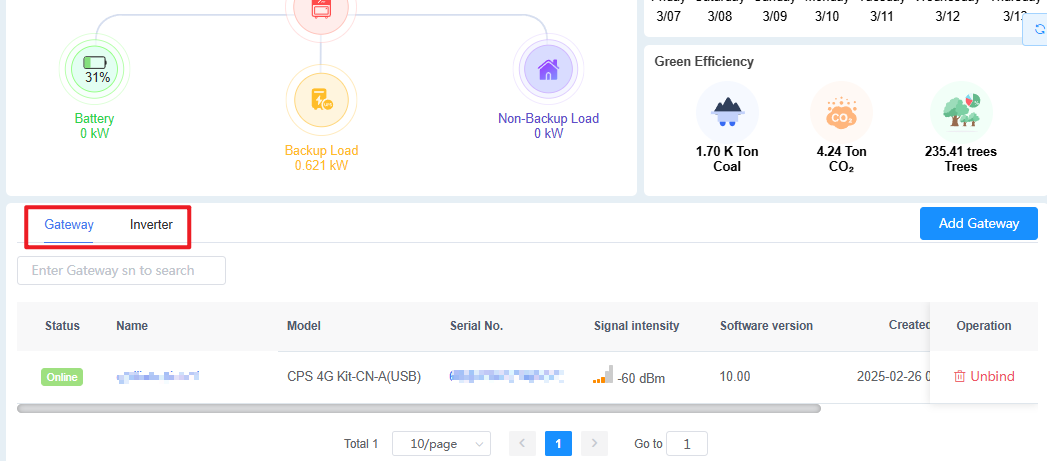
Manage Gateways and Inverters of the Site
The gateway and inverter list displays all gateways and inverters for the current site. Click an item for details.
For Gateway details page introduction, please see Gateway. For Inverter details page introduciton, please see Inverter.
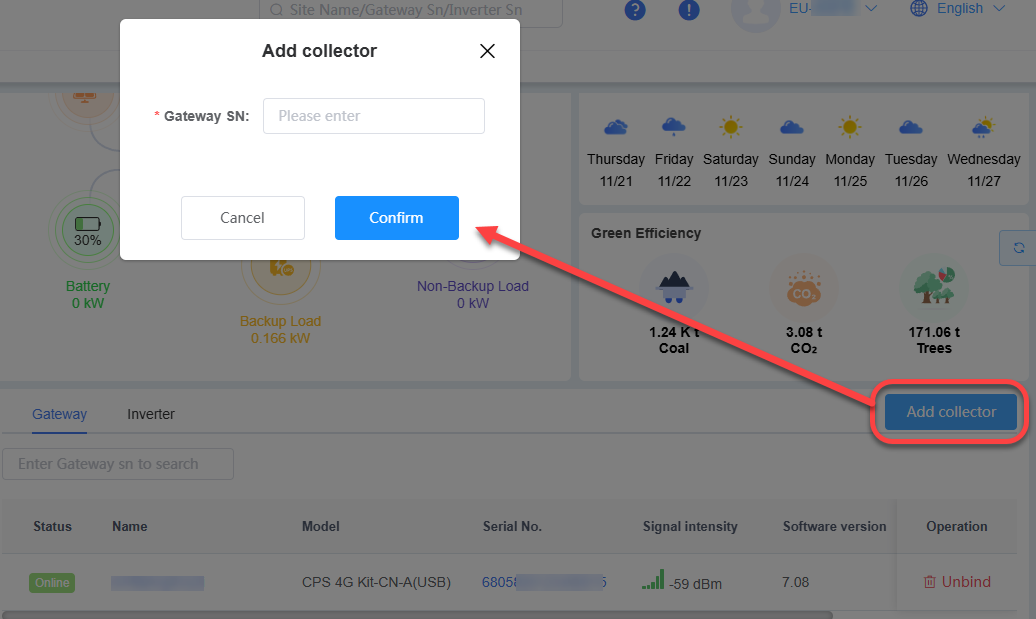
Add a Gateway for the Site
Click Add Gateway in the site details page.
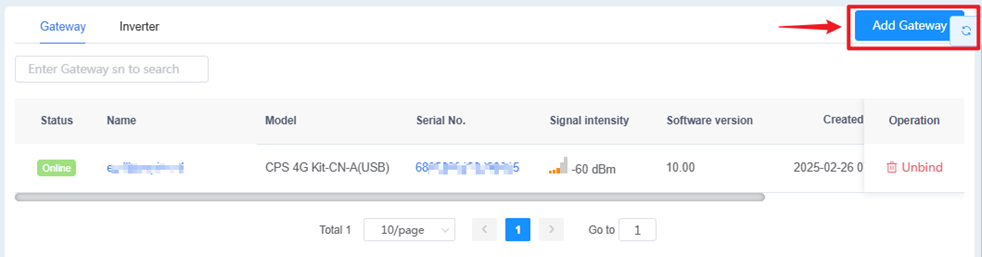
Enter the gateway’s serial number (S/N).
Click Confirm.
Successfully added gateway appear in the Gateway List, along with their associated inverters in the Inverter List.
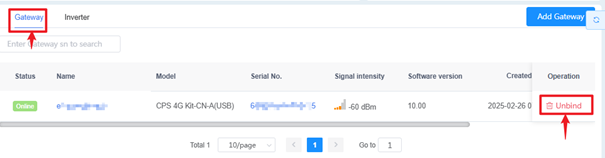
Unbind a Gateway
- Click the Gateway tab.
- In the Operation column, click Unbind next to the gateway to remove it.
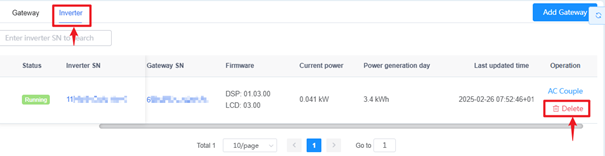
Delete an Inverter
- Click the Inverter tab.
- In the Operation column, click Delete next to the inverter to remove it. Note: This action removes the inverter from both the gateway’s associated inverters and the Inverter List.
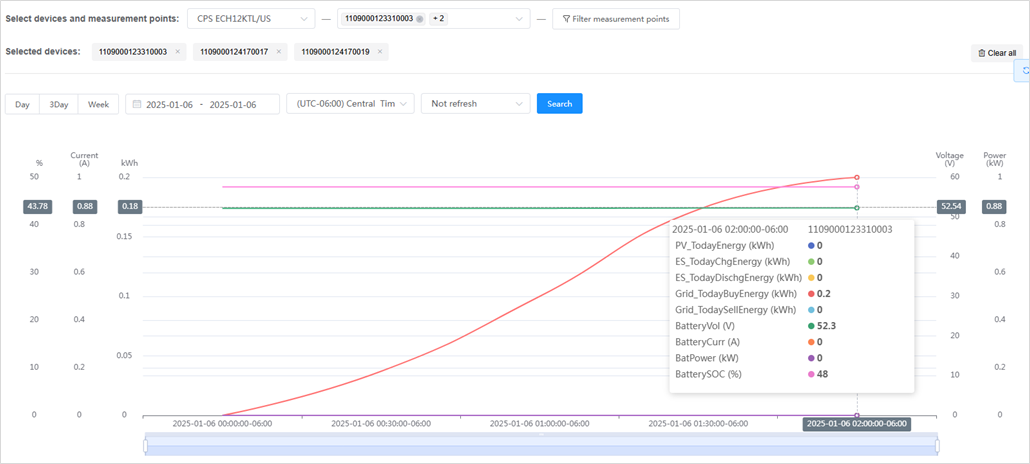
Chart
The Chart menu visually compare data within the power station.
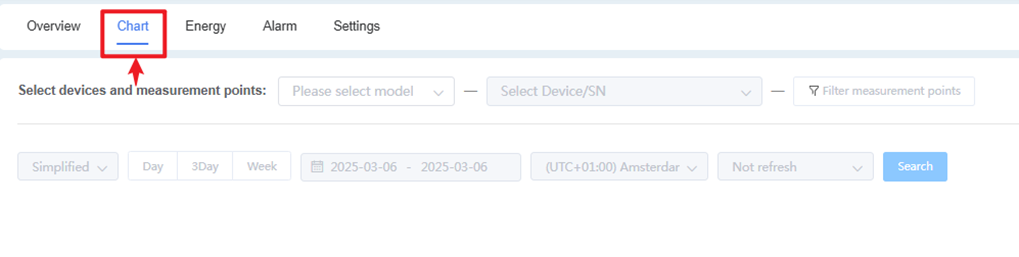
- Click Chart menu.
- Select the model, serial number, and measurement points in order. The data chart will automatically appear on the page. Hover the mouse over the chart will display detailed data for the measurement points.
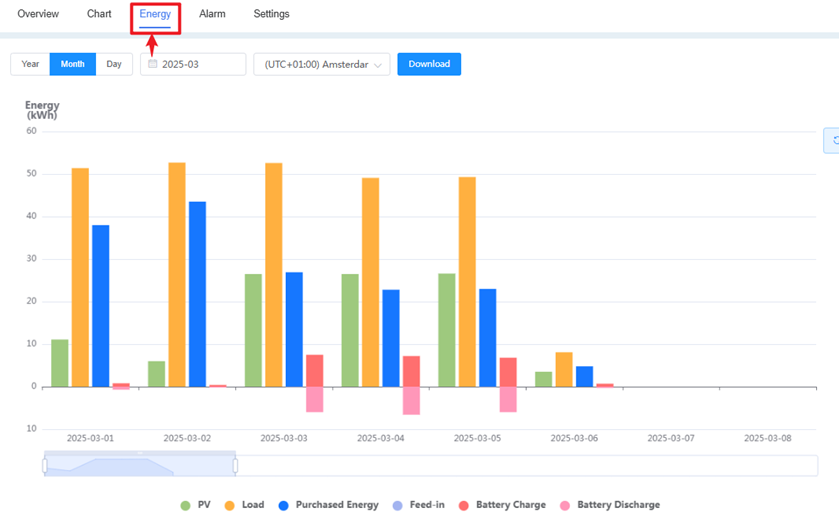
Energy
Under the Site menu, click Select Device and choose a single device to view its generation data.
Select a time range to display an energy generation bar graph across various time periods (year, month, or day). Click Download to save the generation data to your computer.
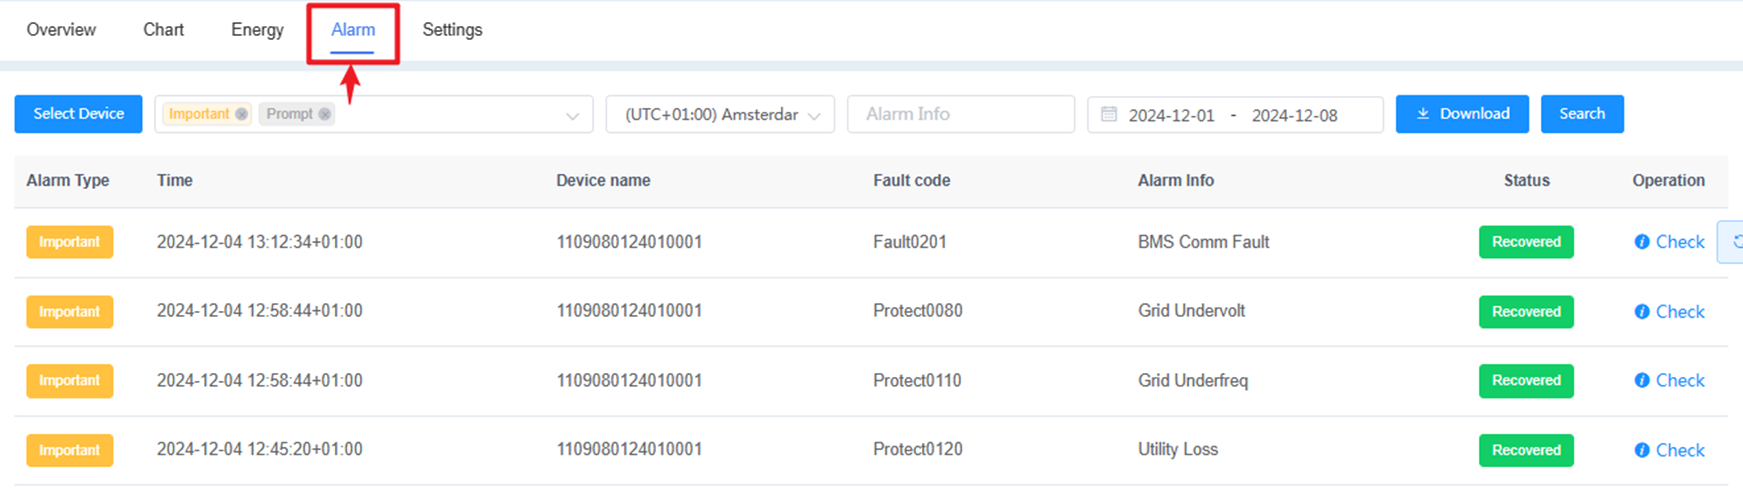
Alarm
When a device experiences an abnormality or fault, key details—such as occurrence time and description—are recorded in real time and listed in the Alarms section.
To view alarms:When a device experiences an abnormality or fault, key details—such as occurrence time and description—are recorded in real time and listed in the Alarms section.
- Select the Alarm.
- Filter alarms according to any of the following criteria:
- Click Select Device to choose a device.
- Click Alarm Type to filter by alarm level.(see the table below for description of alarm type.)
- Time zone
- Alarm info
- Time Range
- Click Download to save the filtered alarms to your computer.
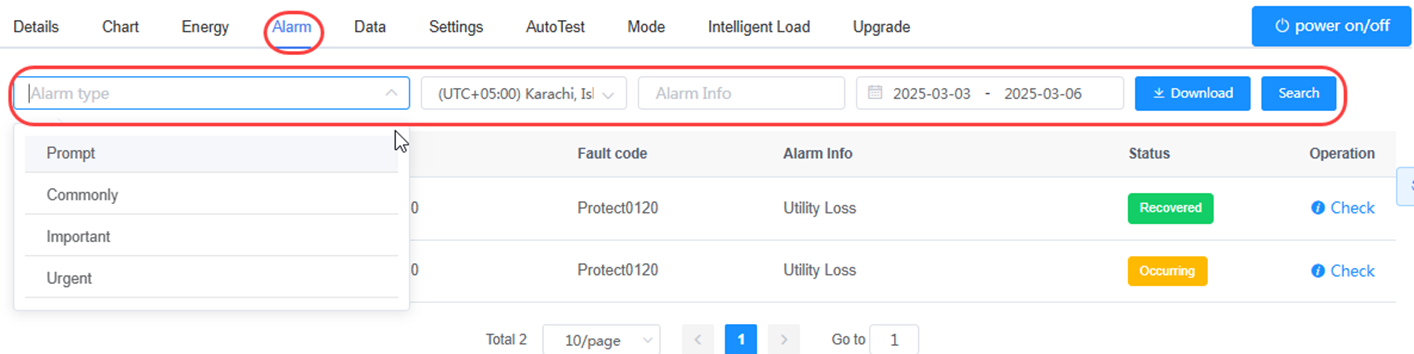
| Alarm Type | Description |
|---|---|
| Urgent | The device has stopped running; immediate intervention is required. |
| Important | Device efficiency is affected; intervention is required. |
| Common | No impact on device operation; intervention is optional. |
| Prompt | Informational messages are displayed. |
Table: Alarm Type
Settings
Remotely configure inverter operating parameters and status. This feature supports remote parameter control for devices and is available only to Operations & Maintenance (O&M) roles.
To configure register parameters:
Click Settings.
Select an inverter from the left panel.
Search the paramtes by Quick Search or Group Search
Quick Search (default): input the keyword to search.

Group Search: Click Quick Search button to switch to Group search page. Filter the parameters by group or keyword.

In the
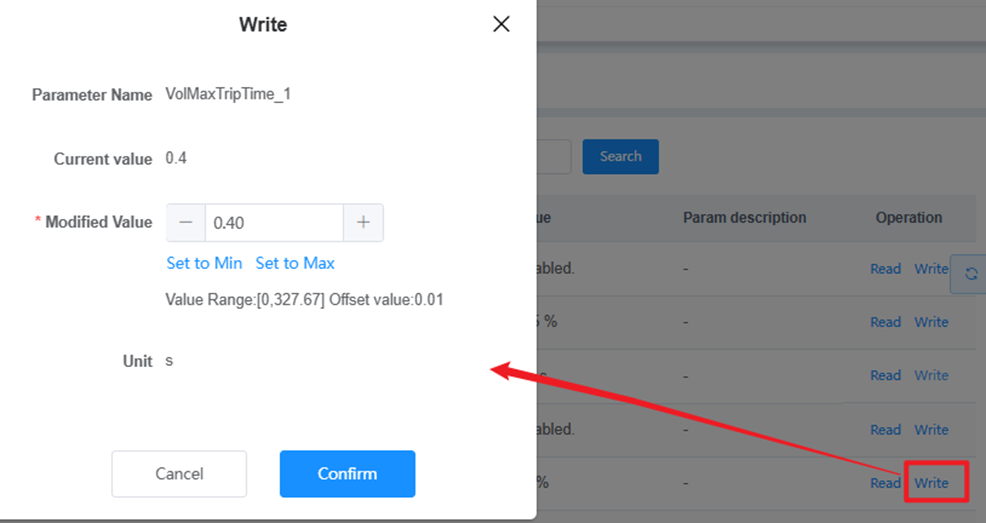
Register Groupdropdown, select a register group:To view a parameter current value, click Read in the Operation column.
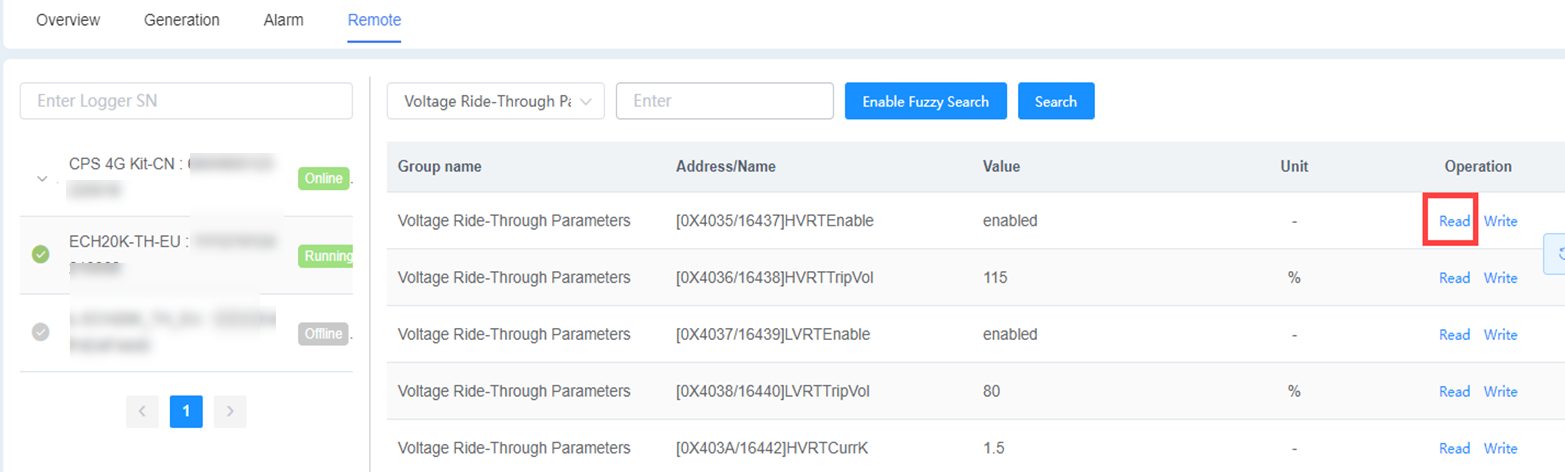
To modify a parameter value, click Write in the Operation column, update the value in the pop-up window (within the specified range), and save the changes.
Commissioning
The commissioning function is only availbale for North America region. The commissioning menu is used to generate the commission report:
- Click Commissioning.
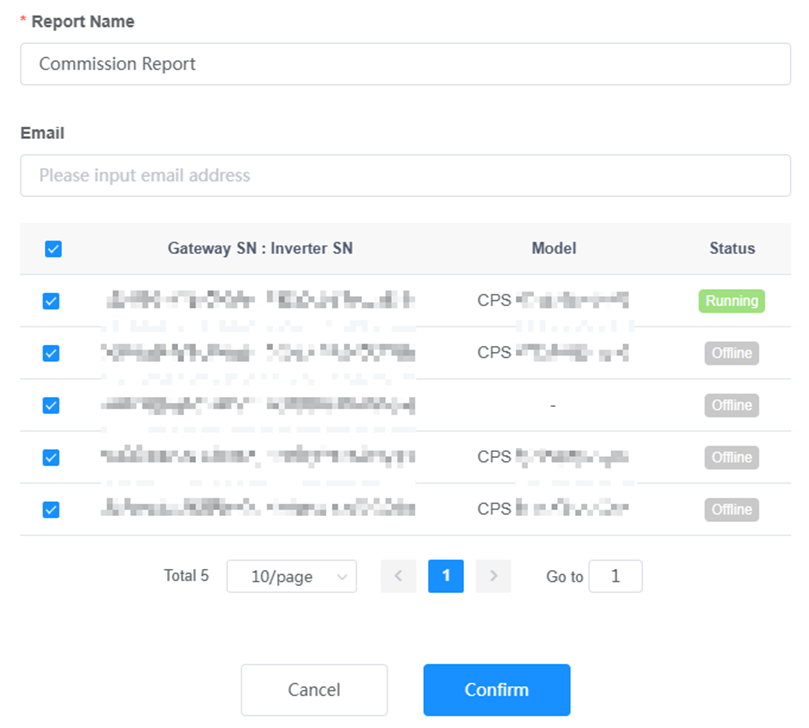
- Click Create.
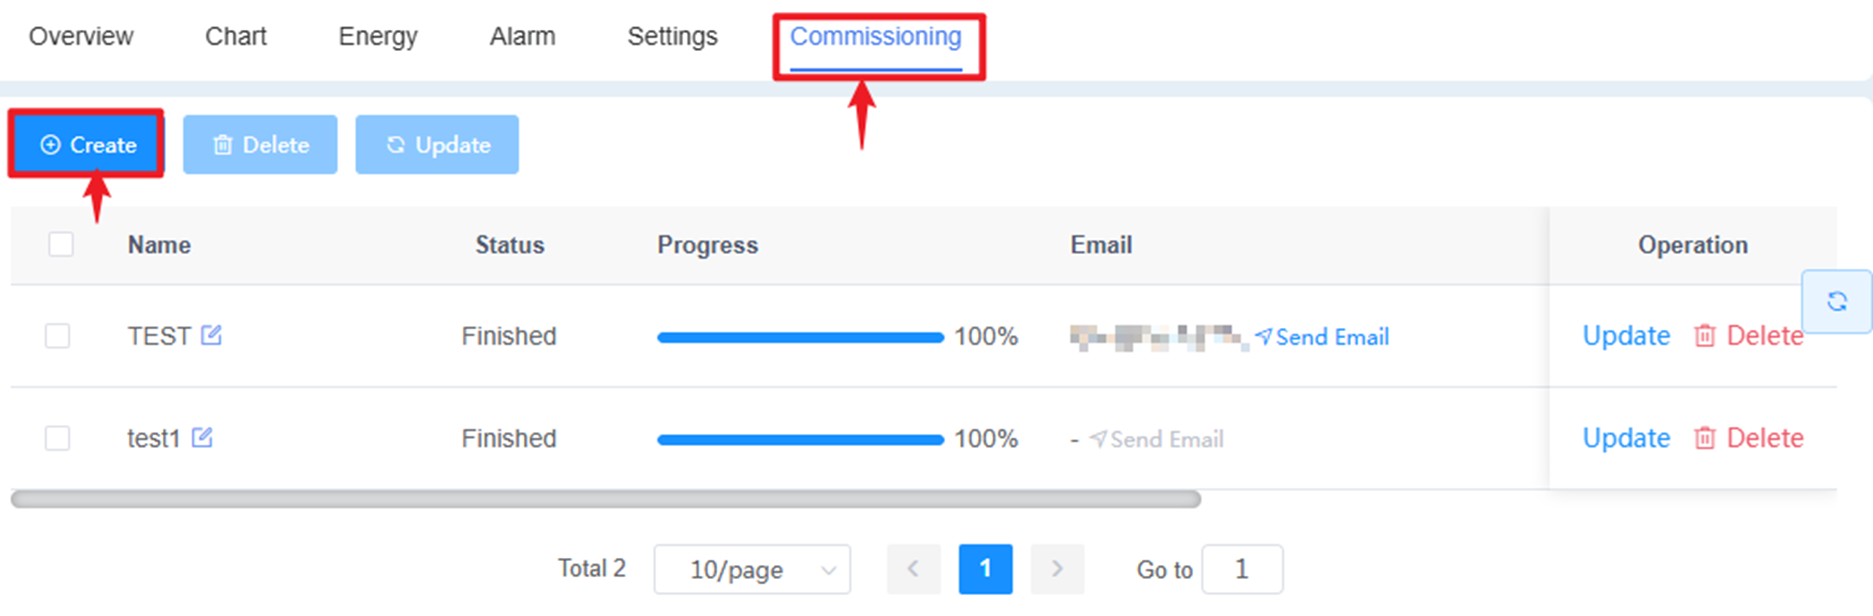
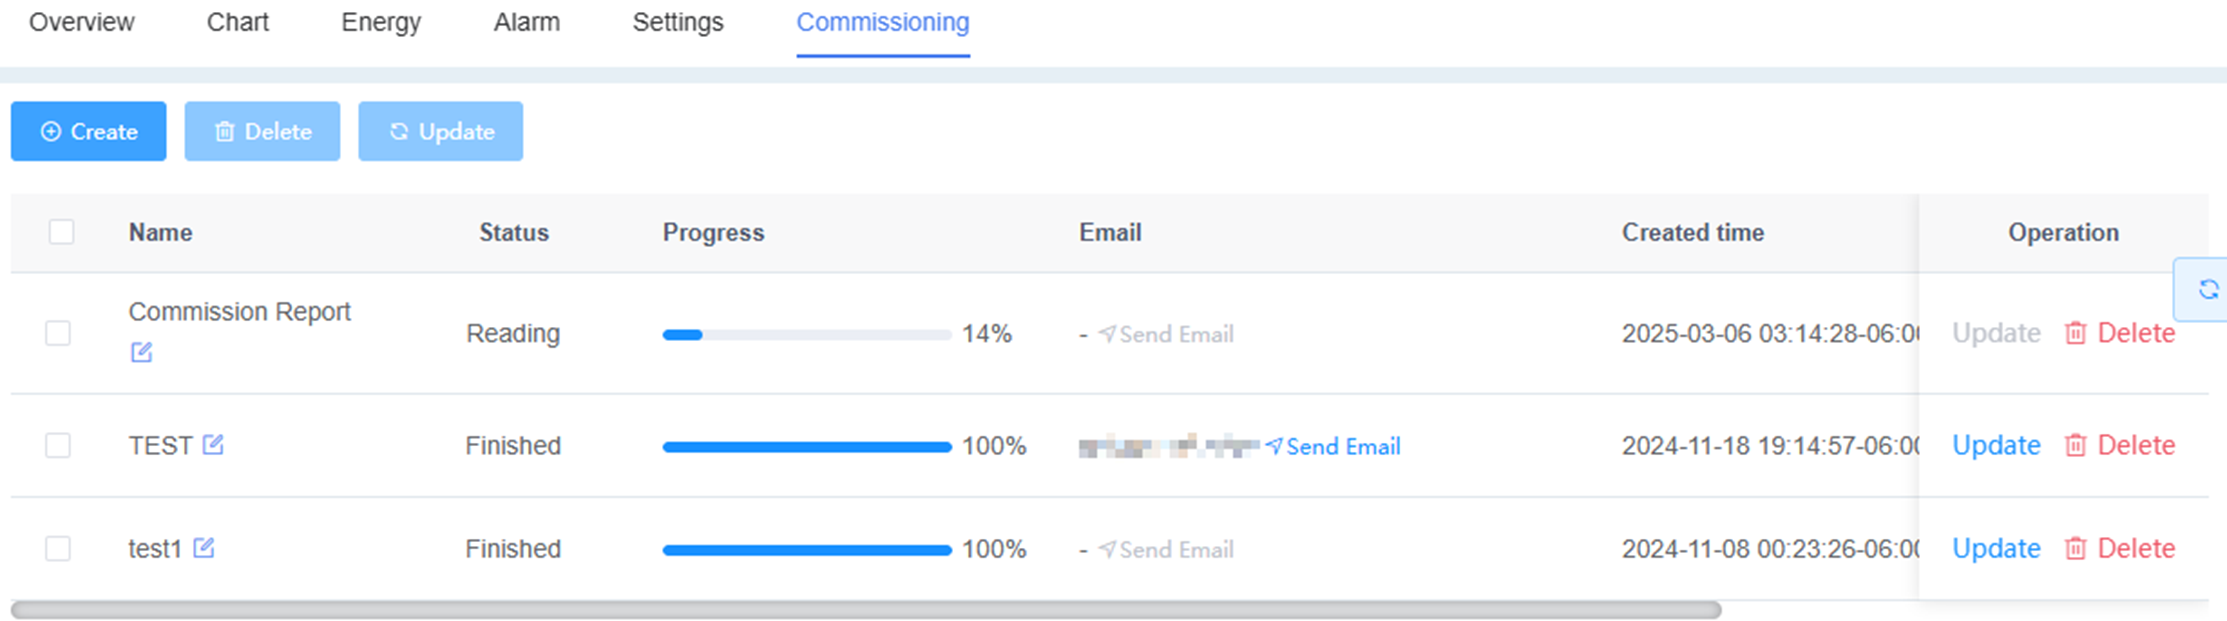
- Input report name, email (optional), select the gateway, then click Confirm.
A commission genration task is created. You can upate or delete the report you created.
Gateway
The Gatewaypage displays a dashboard with gateway status, type, and firmware version details. You can also view all gateways in a list.
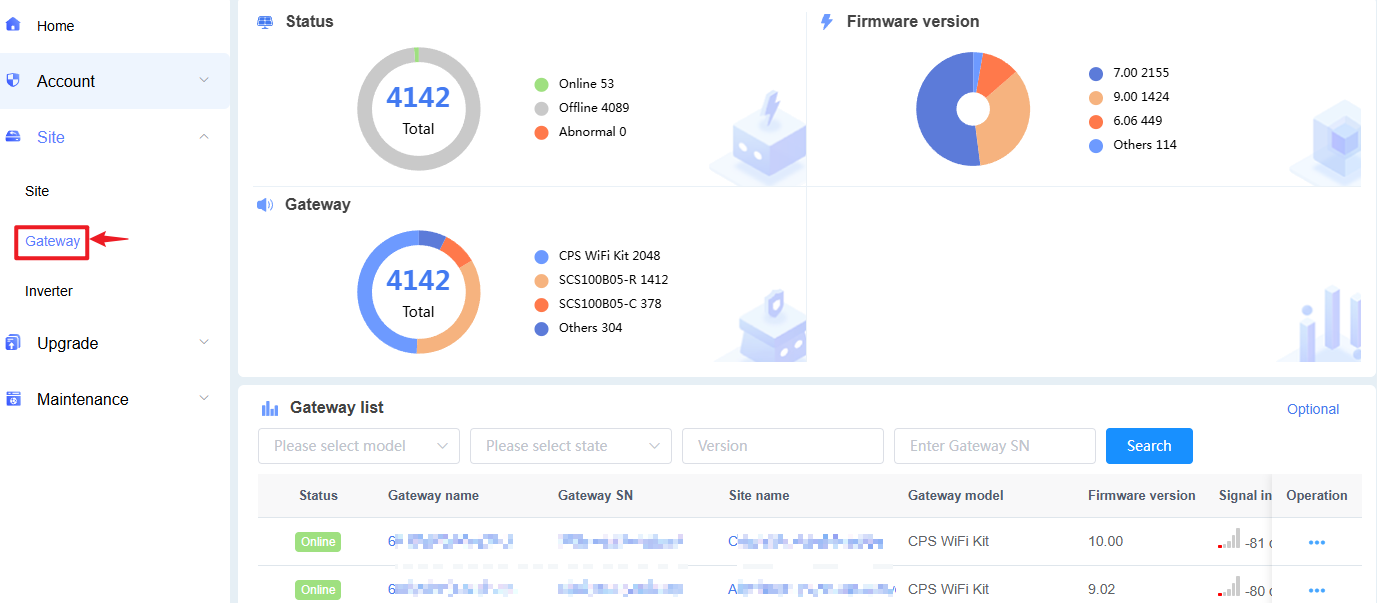
Gateway List
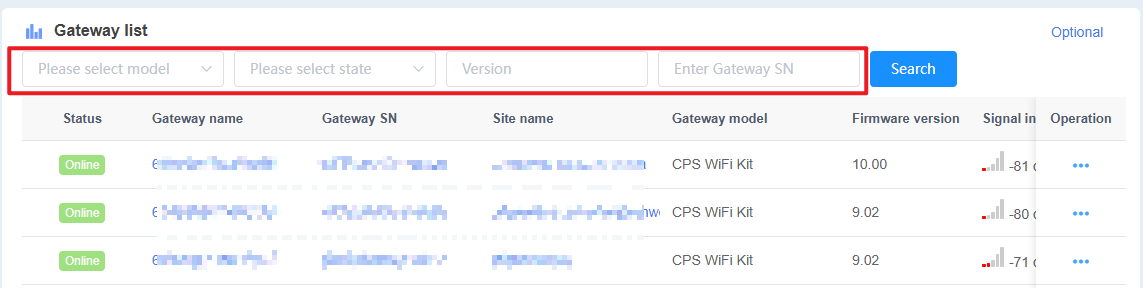
Search for a Gateway
On the Gateway -> Gateway List page, filter gateways using the any of following fields:
- Model: Choose the gateway type (e.g., 4G, WiFi, ETH).
- Status: Select the status (e.g., Online, Offline, Faulty).
- Version: Enter the firmware version.
- Gateway SN: Enter the gateway’s serial number.
Search to view matching gateway details, device information, and configuration options.
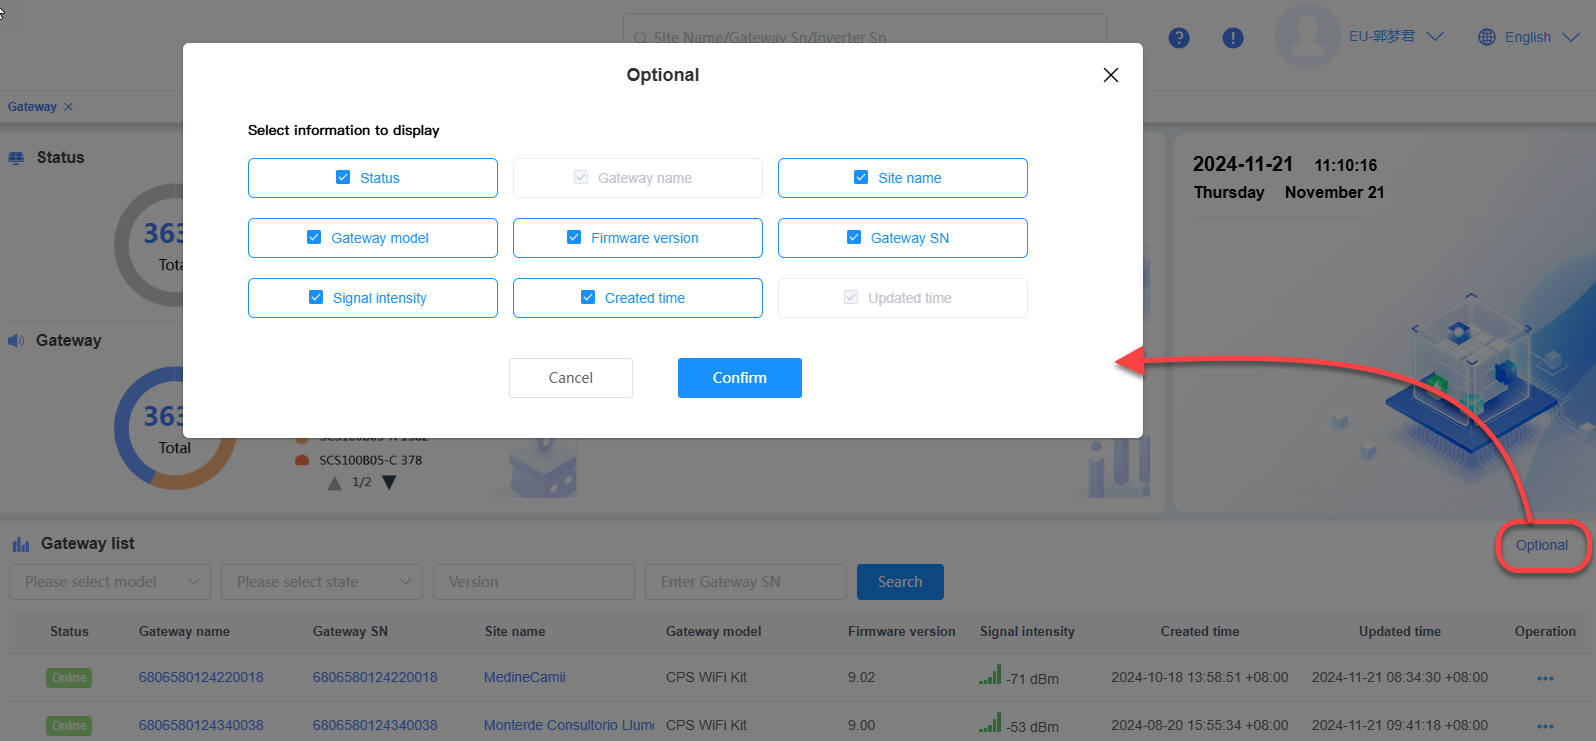
To customize displayed columns:
- Click "ptional in the upper-right corner.
- Uncheck the boxes for columns to hide, then click Confirm. Hidden columns will no longer appear.
Distribute/Rename a Gateway
In the Gateway List area:
Locate the gateway in the list.
In the Operation column, click the … icon next to the gateway.
Choose an option:
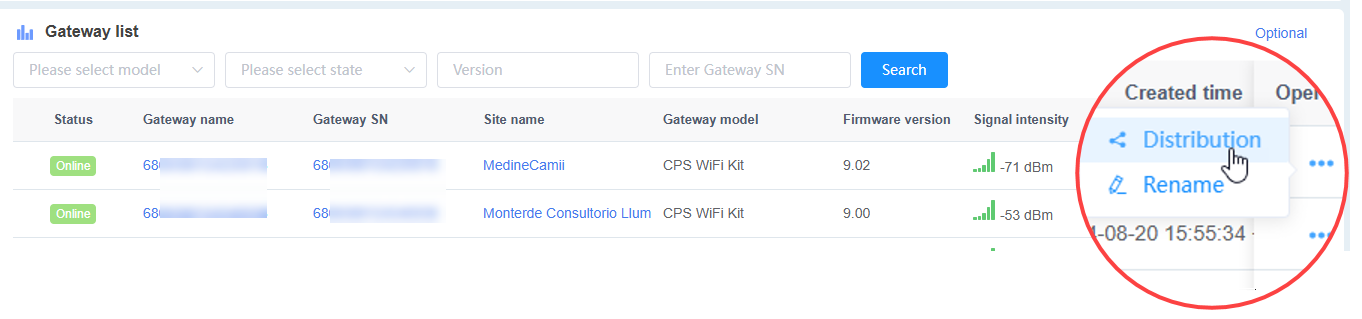
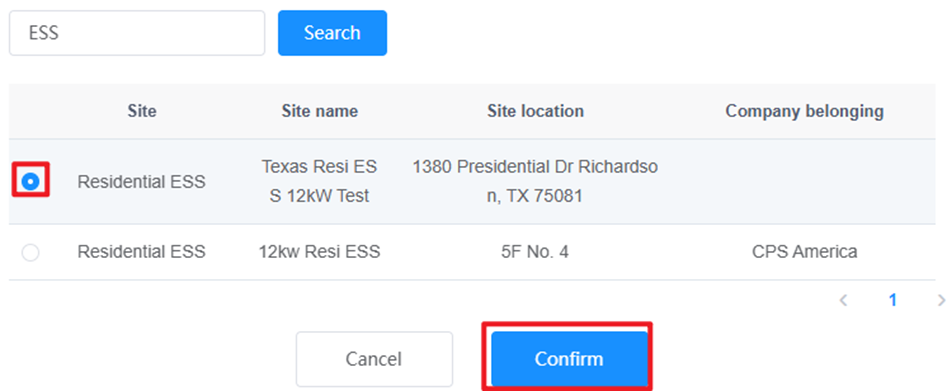
Distribute: Assign the gateway to a site.
Click Distribute.
Select or search for the site to assign, then click Confirm to complete the assignment.
Rename: Update the gateway’s name. (Follow the prompts to enter a new name.)
Gateway Details
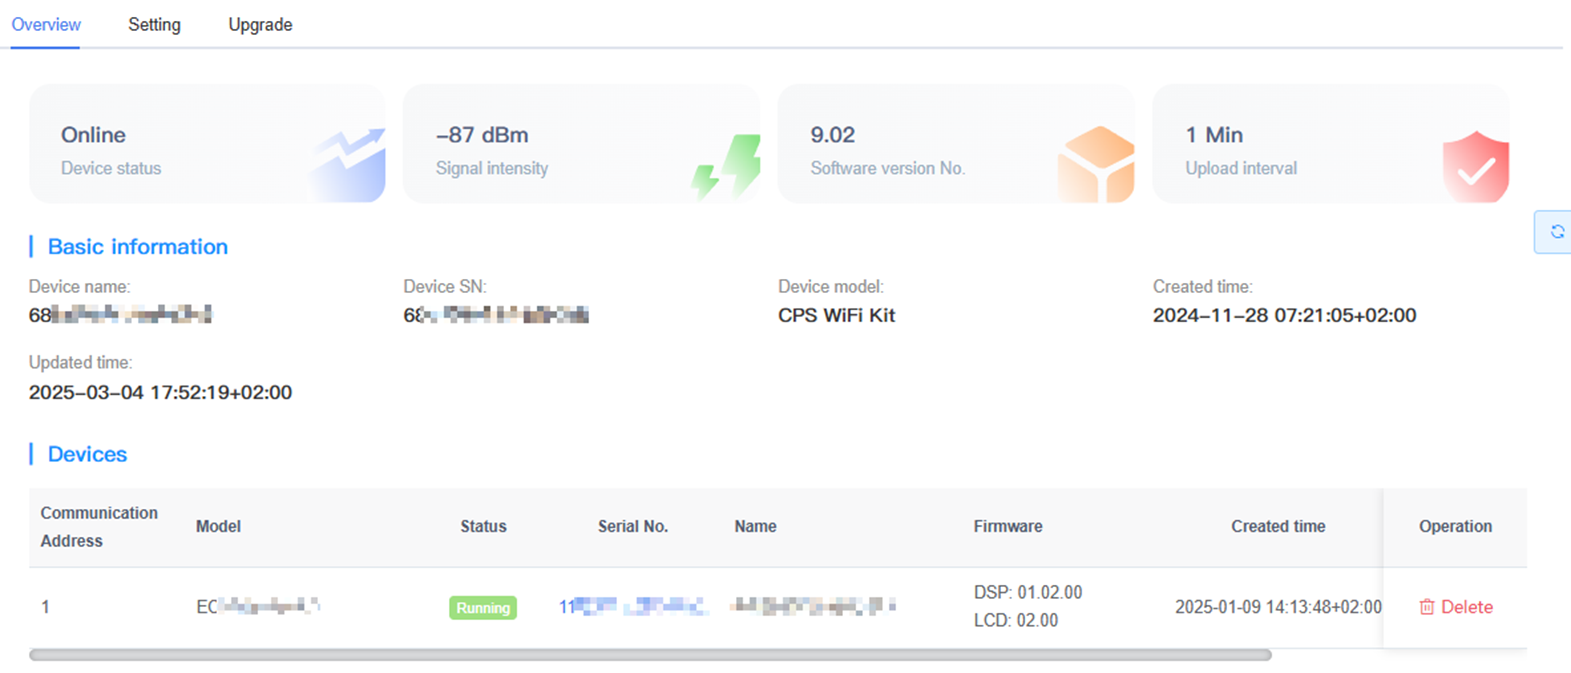
Gateway Overview
Click a gateway name in the Gateway List to open the Gateway Overview page. This page shows the gateway’s basic information and a list of associated devices.
To remove a device:
- In the Devices List, locate the device.
- In the Operation column, click Delete to remove it.
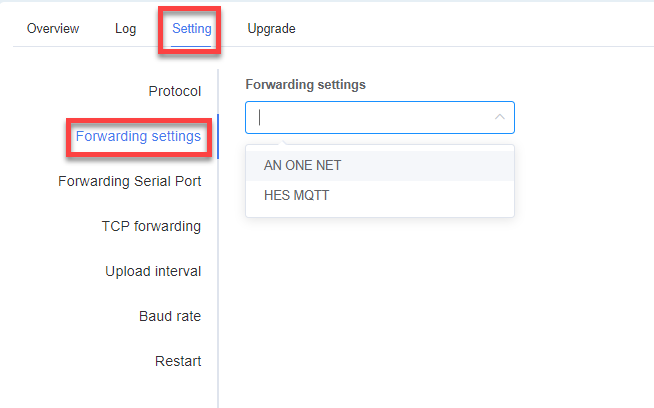
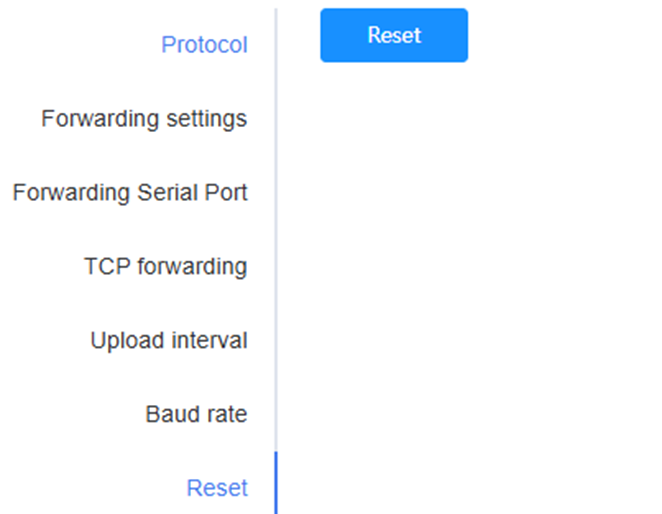
Gateway Setting
Configure network card parameters, including model protocol, upload interval, and device address, as detailed below.
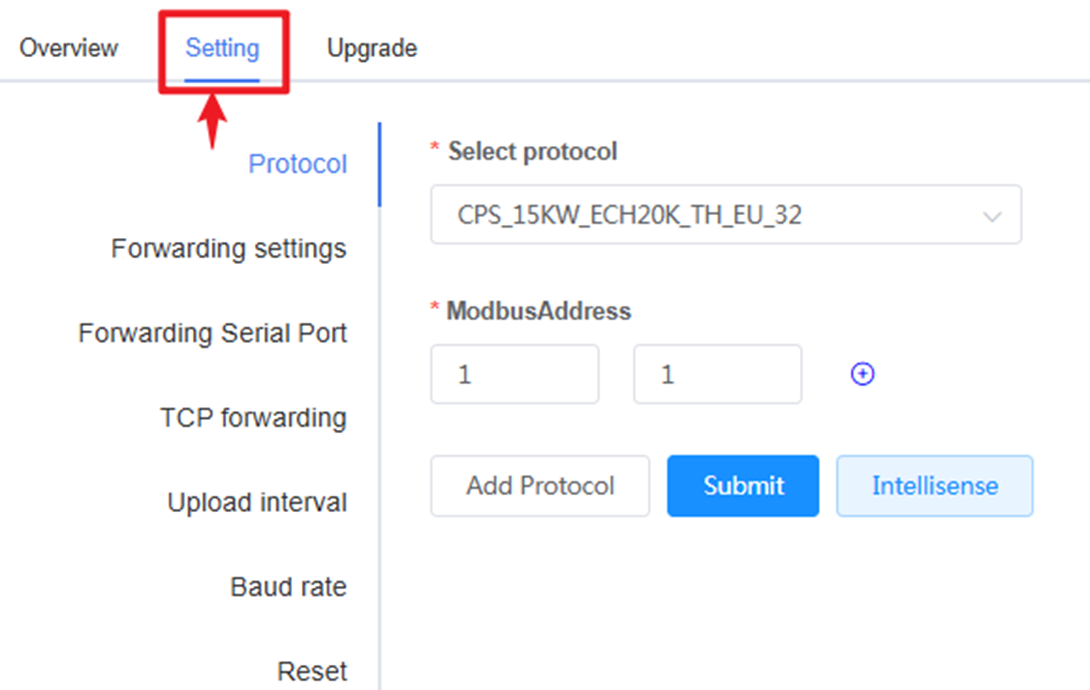
Protocol: Configure device data parsing rules.
- Click Add Protocol to add a protocol address and selection.
- Click Submit Settings to apply changes and restart the network card (10–20 seconds).
- Click Intellisense to automatically detect the device protocol.
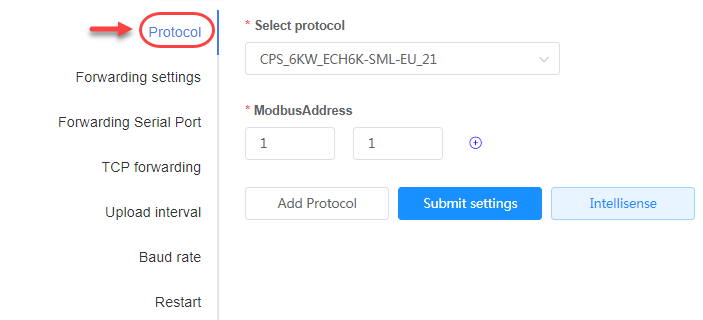
Parameter Description Select Protocol Choose the parsing protocol for device data uploaded via the network card. Modbus Address Set the address used by the protocol for data parsing. Forwarding Settings: Select forwarding options from the dropdown.
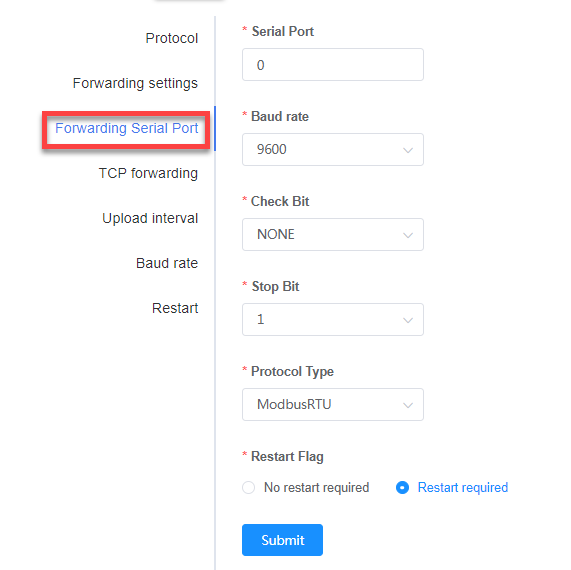
Forwarding Serial Port
- Enter the communication port.
- Select the baud rate, parity (check digit), protocol type, and other details as needed.
- Click "Submit" to apply the settings.
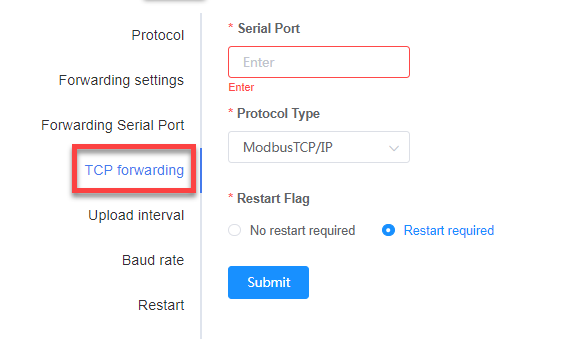
TCP Forwarding: Configure the TCP forwarding port and protocol.
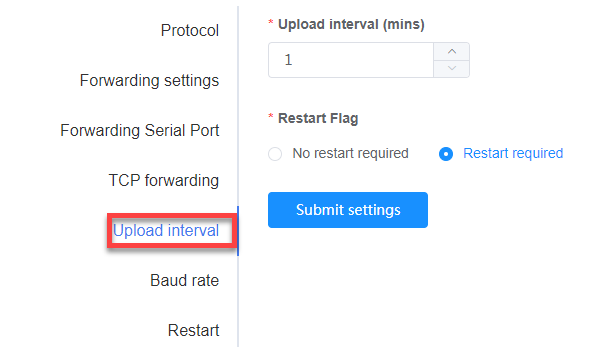
Upload Interval: Set the device data upload frequency.
- Select the interval.
- Choose whether to restart safely (10–20 seconds).
- Click "Submit Settings" to apply the changes.
Baud Rate: Set the transmission speed of communication data; adjust to match the device’s rate.
- Select or enter the baud rate and related options.
- Click Submit to confirm and apply the settings.

Reset: Click "Reset" to reboot the gateway.
Gateway Remote Read Write
It is mainly used for debugging the device register. In the gateway list page, click any gateway name or serial number to enter Overview page by default. Click "Remote Read Write" in the navigation menu to enter the page.
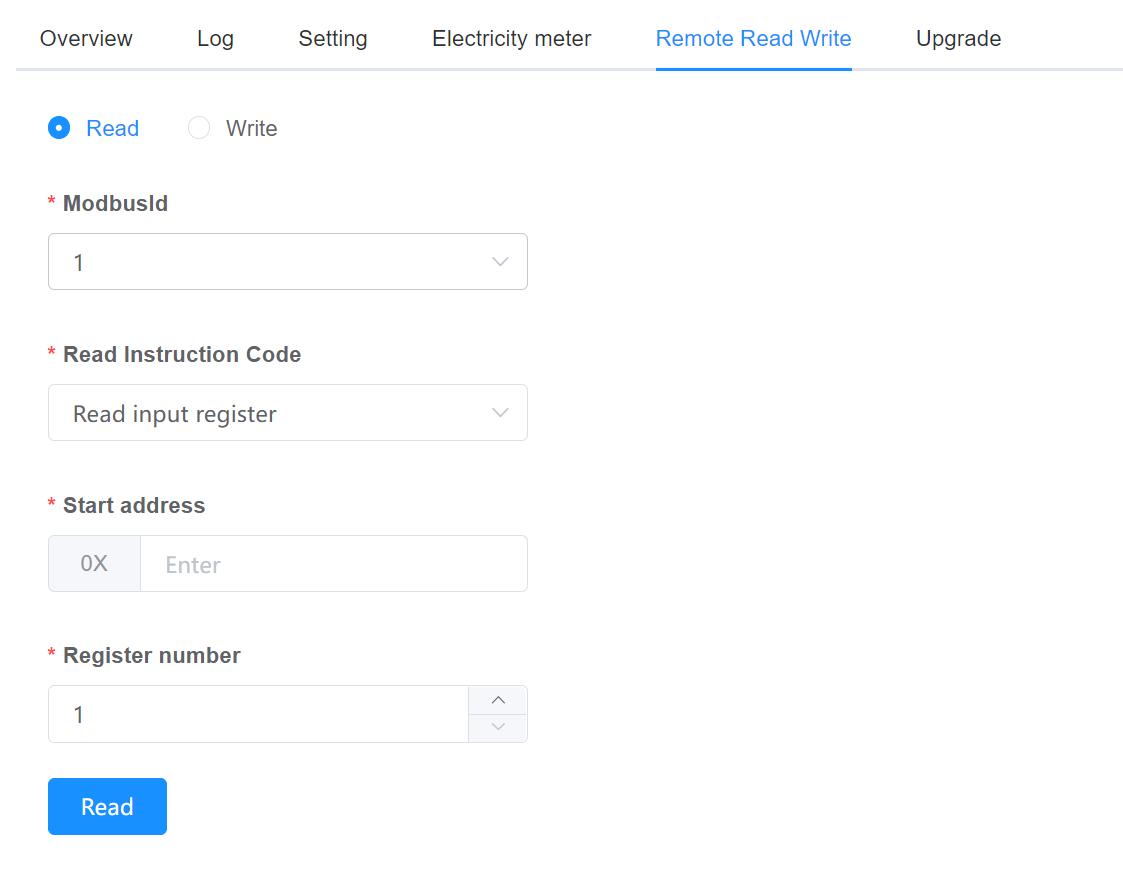
Parameter description
| Parameter | Description |
|---|---|
| Read/Write | elect Read or Write |
| ModBusId | Communication address of the device. Can be viewed from the device list |
| Read/Write Instruction Code | (This parameter is not required for sending a Write command) After the Read command is sent. Select according to register type |
| tart address | Start address of register |
| Registers number | The fundamental number |
| Result | Return result |
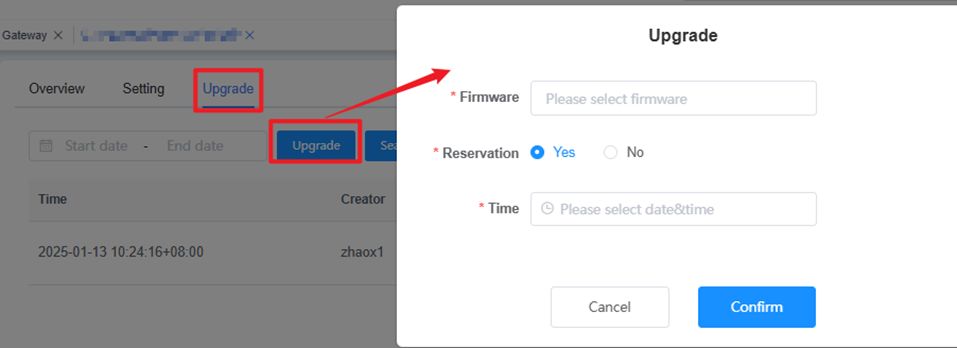
Gateway Upgrade
To upgrade a gateway:
Click Upgrade to open the upgrade window.
Choose the firmware version and reservation option, then click "Confirm" to start the upgrade:
- Firmware: The firmware version to apply to the network card.
- Reservation: Select
Yesto schedule the upgrade orNoto upgrade immediately. - Time: Set the upgrade time if
Yesis selected under Reservation.
Inverter
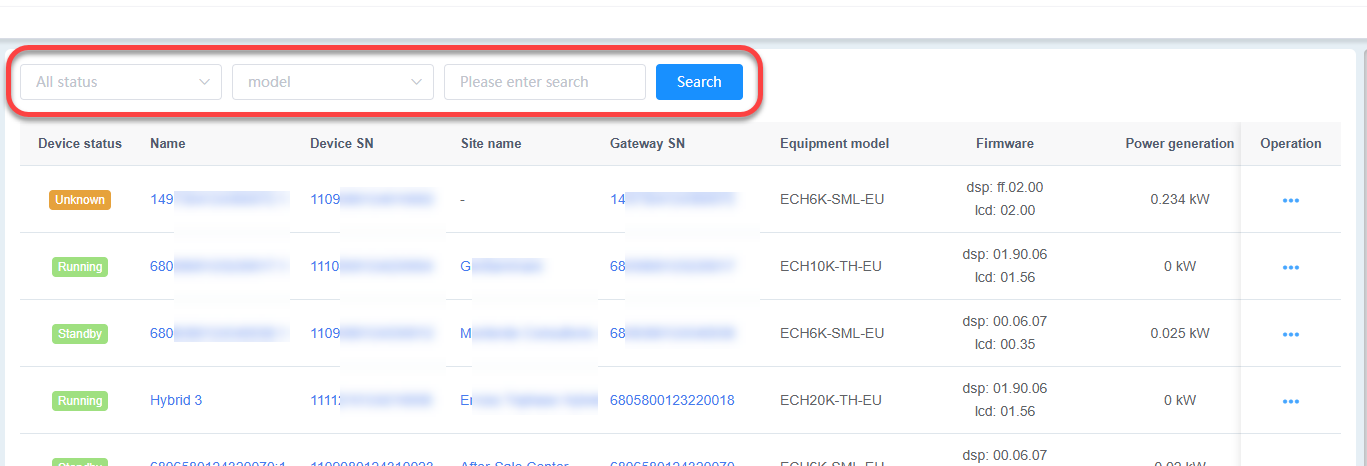
The Inverter page lists all inverters and allows you to manage them.
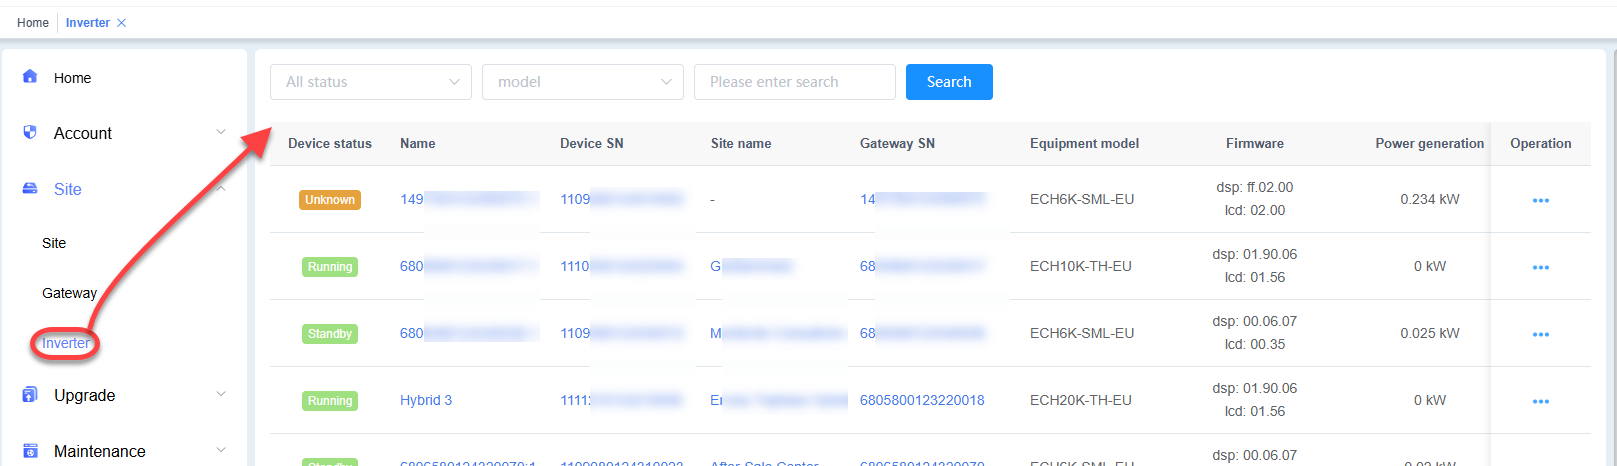
Search for an Inverter
- On the Inverter page, use the following fields to locate inverters:
- All Status: Select the device status (e.g., Online, Offline).
- All Models: Choose the inverter model.
- Please Enter Search: Enter a keyword (e.g., serial number or name).
- Click Search to display matching inverters.
For a specific inverter:
- In the operation column, click the … icon.
- Choose Delete to remove it or Rename to update its name.

Inverter Information
Details
From the Inverter list page, click an inverter’s name or serial number (S/N) to open its details page by default and view its information. This page displays the inverter’s current information, such as status and Inversion Inforamtion.
To control the inverter, click Power On/Off to turn it on or off.

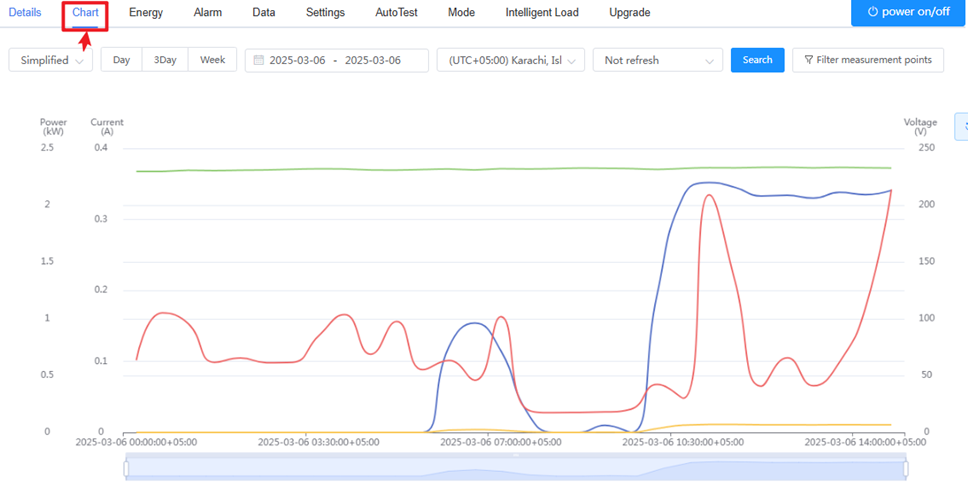
Chart
To view inverter chart data by configuring:
- Chart style (Simplified or Detailed).
- Time interval, dimension, and range.
- Refresh interval.
- Measurement Points (e.g., Generation, Temperature, Power, AC, DC).
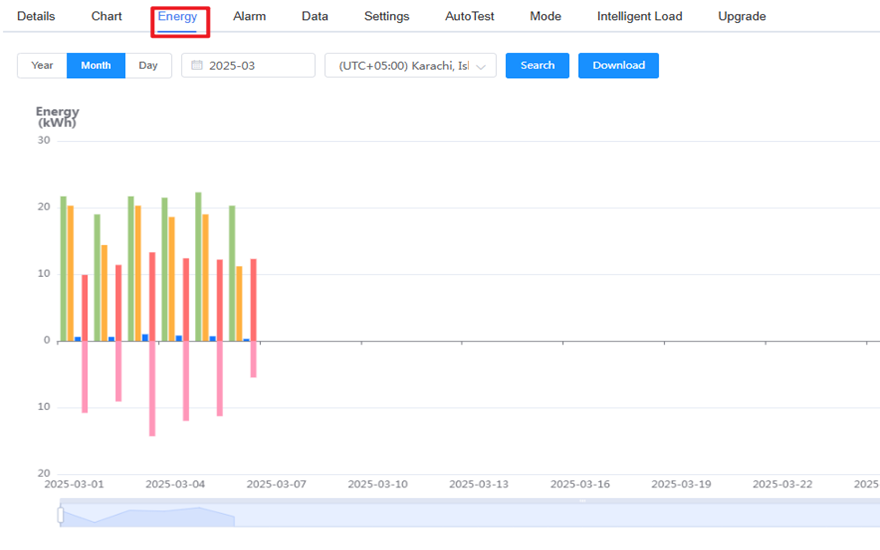
Energy
To view energy data:
- Select a time dimension (e.g. year, month, day).
- Click the calendar to choose a specific year/month/date.
- Click Download to save the energy yield data for the selected time range to your computer.
Alarms
Search for alarm events by:
- Selecting the alarm type.
- Choosing a time range.
- Clicking Search to view results.
- Clicking Download to save the alarm details to your computer.
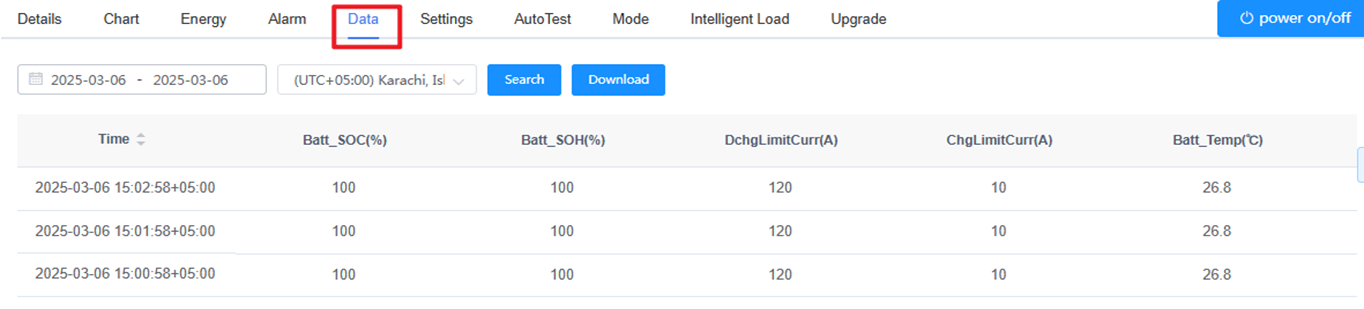
Data
To view device data:
- Select a time range.
- Click Search to display data for that period.
- Click Download to save the data to your computer.
Settings
Select Settings from the function bar to view or edit register parameters.

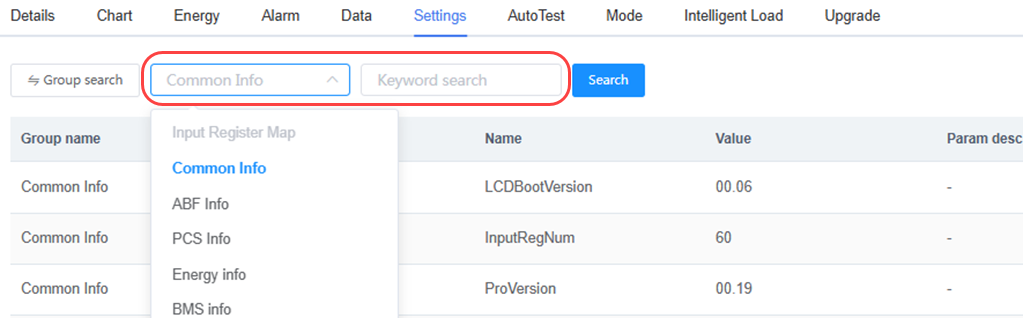
Search Parameters
Quick Search: Quick search is default by clickint Settings. Enter the keyword to search.
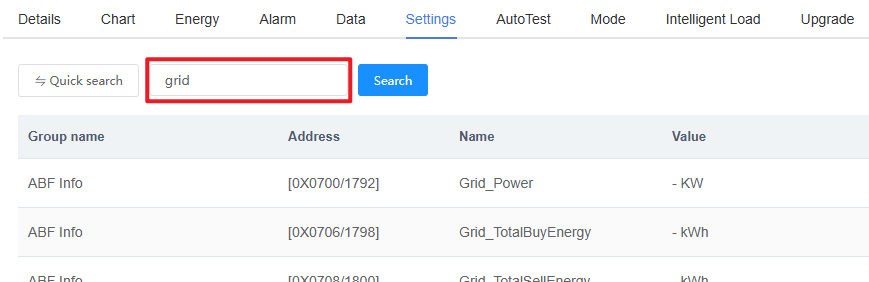
Group Search: click quick search button to switch to group serach, select a register group or enter the keyword to search.
Read and Write Parameters
- Click Read in the Operation column to view the current parameter value.
- Click Write in the Operation column to edit the parameter value.
Note: The Write option is available only for Hold Register Map parameters.

AutoTest
AutoTest is only avalible for Italy. After confirm the test conditions, check the agreement, then click start to test.

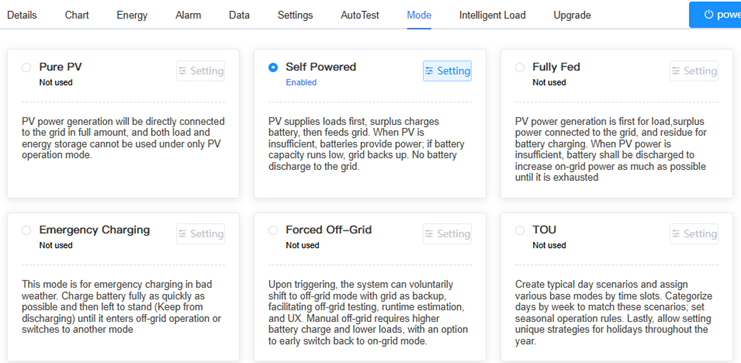
Mode
Select Mode from the function bar to control the operation mode of energy storage inverters.
| Mode | Description |
|---|---|
| PV Mode | PV generation connects directly to the grid; load and energy storage are disabled. |
| Self-Consumption | PV prioritizes loads, then charges the battery, then feeds the grid. Battery discharges to loads when PV is low, but not to the grid; grid backs up if needed. |
| Full Feed-In | PV prioritizes loads, then feeds the grid, then charges the battery. Battery discharges to maximize grid feed-in when PV is insufficient. |
| Emergency Charging | Charges the battery fully and quickly in bad weather, then holds charge until off-grid mode or another mode is selected. |
| Forced Off-Grid | Shifts to off-grid mode with grid backup for testing or runtime estimation. Requires high battery charge and low loads; allows early return to on-grid mode. |
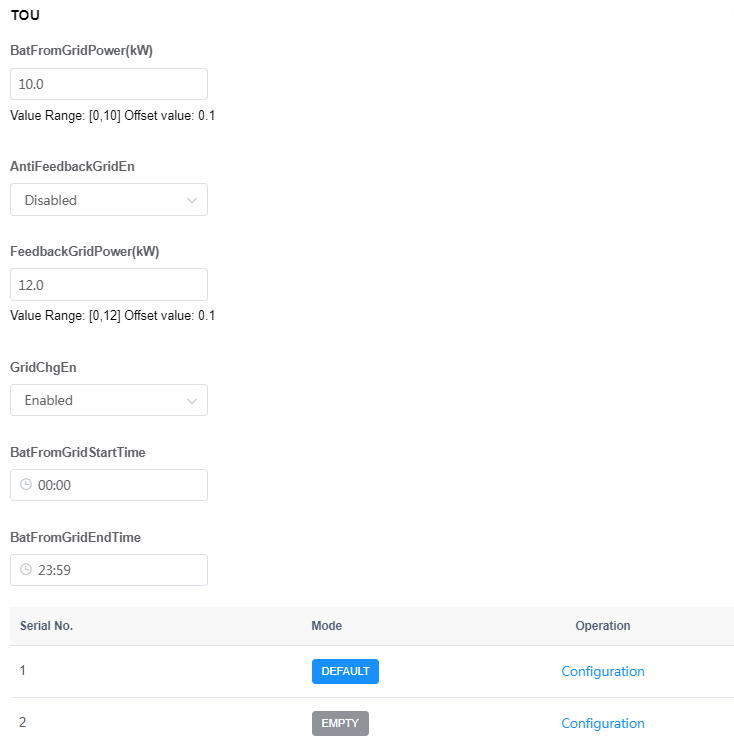
| TOU Mode | Sets time-based scenarios with base modes, weekly categories, seasonal rules, and holiday strategies. |
To configure a mode:
- Click "Setting" button next to the mode (e.g., TOU Mode).
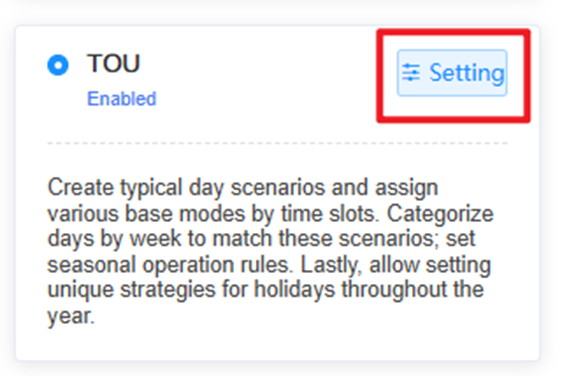
- Adjust the parameters as needed.
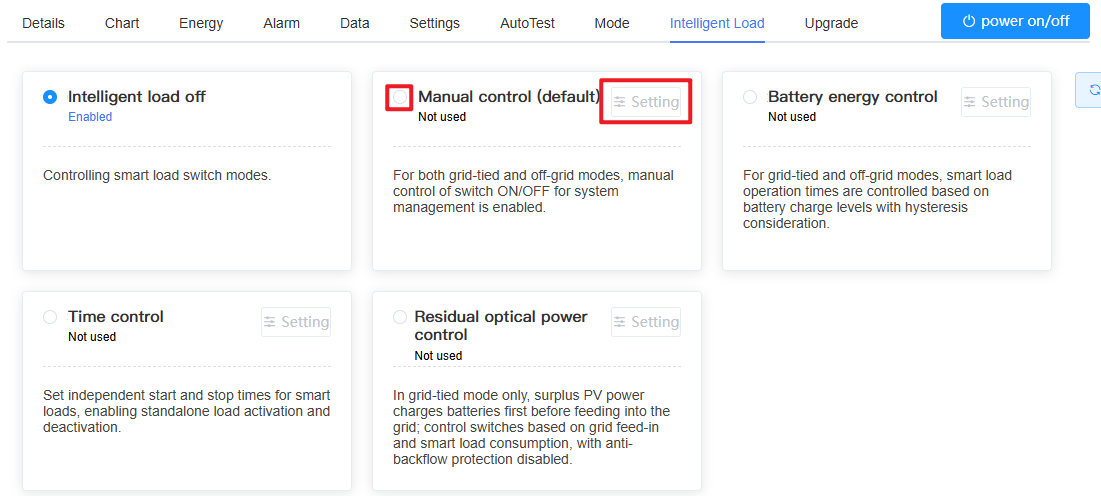
Intelligent Load
Select Intelligent Load from the function bar to configure smart load settings.
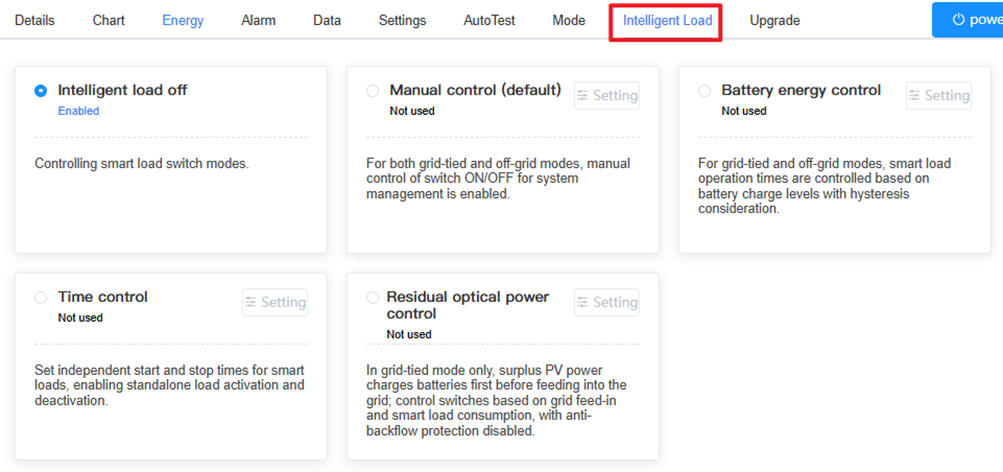
| Mode | Description |
|---|---|
| Intelligent Load | Disables smart load switch control. |
| Manual | Enables manual ON/OFF control for grid-tied and off-grid modes (default). |
| Battery Energy | Controls load operation times based on battery charge levels with hysteresis, for both grid-tied and off-grid modes. |
| Time Control | Sets independent start/stop times for smart loads in standalone operation. |
| Residual Optical Power Control | In grid-tied mode, surplus PV power charges batteries before feeding the grid, managing switches based on feed-in and load consumption (anti-backflow disabled). |
To configure the intelligent load parameters, select the load mode, then click Setting button to configure.
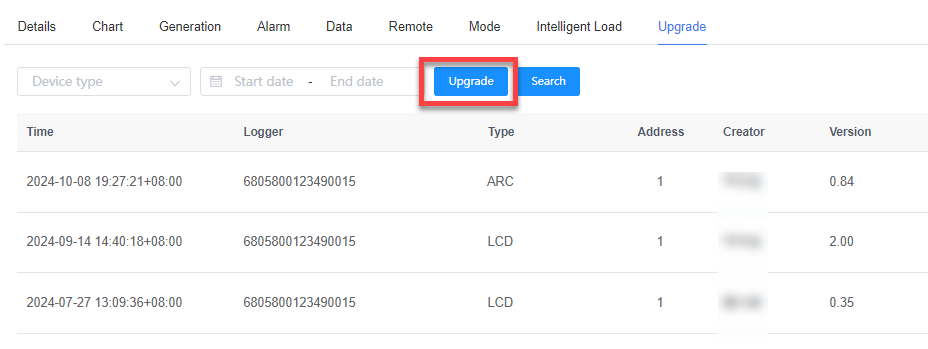
Upgrade
The upgrade page manages firmware updates for inverters, displaying version history and logs.
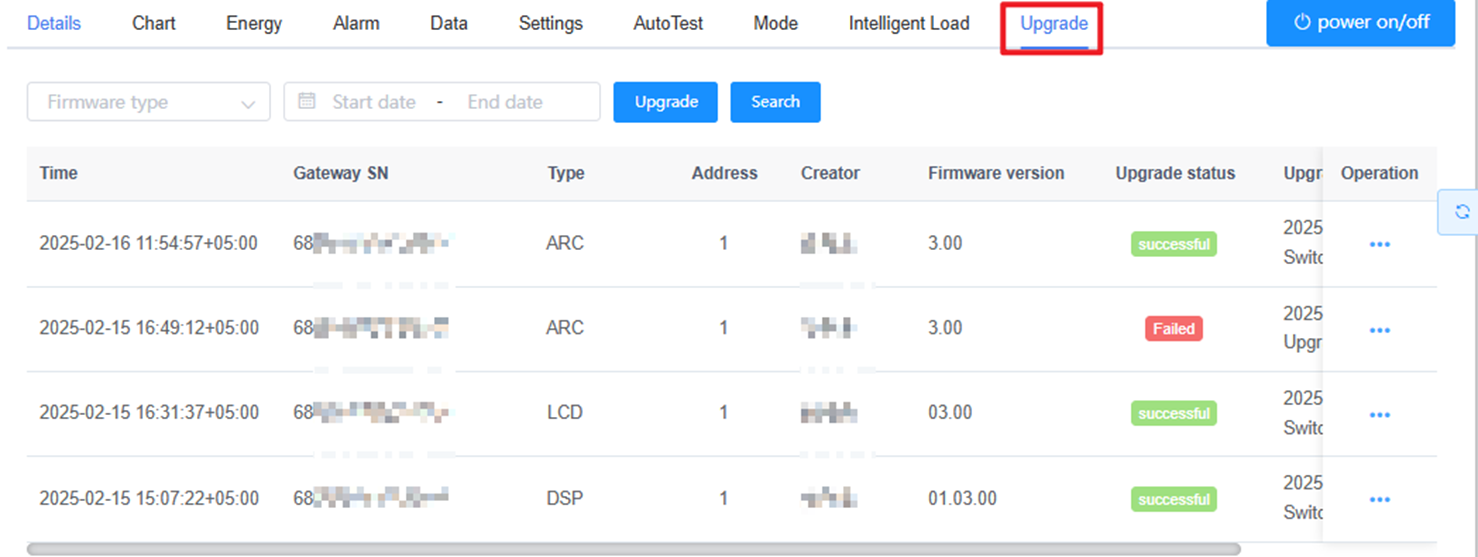
To upgrade firmware:
- Click Upgrade next to the inverter.
- Select the firmware type and version.
- Choose a reservation option and, if applicable, set the upgrade time.
- Click Confirm to add the task to the upgrade list.
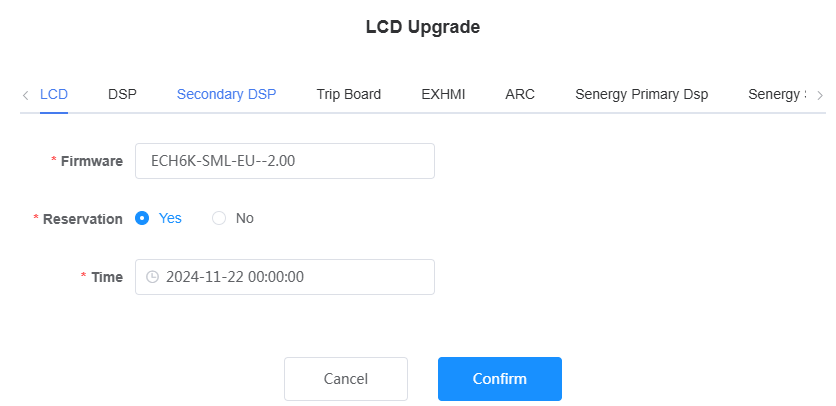
| Parameter | Description |
|---|---|
| Firmware Type | Select the type (e.g., LCD, DSP, Slave DSP, Trip Board, EXHMI, ARC, Senergy Master DSP, Senergy Slave DSP, Senergy CSB, Senergy Module, etc.). |
| Firmware | Choose the firmware version to apply. |
| Reservation | SelectYes to schedule the upgrade or No to upgrade immediately. |
| Time | Set the upgrade time if Yes is selected under Reservation. |
System Release
This feature is available exclusively for commercial, industrial, and utility energy storage systems in North America region. Contact technical support to activate the necessary permissions if access is required.